Object Detection
Note
We assume that by now you have already read the previous tutorials. If not, please check previous tutorials at http://opencv-java-tutorials.readthedocs.org/en/latest/index.html. You can also find the source code and resources at https://github.com/opencv-java/
우리는 지금까지 이미 이전 튜토리얼을 읽었다 고 가정합니다. 그렇지 않은 경우 http://opencv-java-tutorials.readthedocs.org/en/latest/index.html에서 이전 자습서를 확인하십시오. https://github.com/opencv-java/에서 소스 코드와 리소스를 찾을 수도 있습니다.
Goal
In this tutorial we are going to identify and track one or more tennis balls. It performs the detection of the tennis balls upon a webcam video stream by using the color range of the balls, erosion and dilation, and the findContours method.
이 튜토리얼에서는 하나 이상의 테니스 공을 식별하고 추적 할 것입니다. 공의 색 범위, 침식 및 팽창, findContours 메서드를 사용하여 웹캠 비디오 스트림에서 테니스 공의 탐지를 수행합니다.
Morphological Image Processing
Is a collection of non-linear operations related to the morphology of features in an image. The morphological operations rely only on the relative ordering of pixel values and not on their numerical values. Some of the fundamental morphological operations are dilation and erosion. Dilation causes objects to dilate or grow in size adding pixels to the boundaries of objects in an image and therefore the holes within different regions become smaller. The dilation allows, for example, to join parts of an object that appear separated. Erosion causes objects to shrink by stripping away layers of pixels from the boundaries of objects in an image and therefore the holes within different regions become larger. The erosion can be used to remove noise or small errors from the image due to the scanning process. The opening is a compound operation that consist in an erosion followed by a dilation using the same structuring element for both operations. This operation removes small objects from the foreground of an image and can be used to find things into which a specific structuring element can fit. The opening can open up a gap between objects connected by a thin bridge of pixels. Any regions that have survived the erosion are restored to their original size by the dilation.
비선형 연산 모음은 이미지의 지형지 물의 형태와 관련이 있습니다. 형태 론적 연산은 픽셀 값의 상대적 순서에만 의존하고 수치 값에는 의존하지 않습니다. 기본적인 형태학적인 작업의 일부는 팽창과 침식입니다. Dilation은 객체가 확대되거나 크기가 커져 이미지의 객체 경계에 픽셀을 추가하므로 다른 영역의 구멍이 더 작아집니다. 확장은 예를 들어 분리 된 것처럼 보이는 객체의 부분을 결합하는 것을 허용합니다. 침식은 이미지의 오브젝트 경계에서 픽셀 레이어를 제거하여 오브젝트를 축소 시키므로 서로 다른 영역의 홀이 커집니다. 침식은 스캔 프로세스로 인해 이미지에서 노이즈 또는 작은 오류를 제거하는 데 사용할 수 있습니다. 오프닝은 두 작업에 동일한 구조 요소를 사용하는 확장에 이어 침식으로 구성된 복합 연산입니다. 이 작업은 이미지의 전면에서 작은 객체를 제거하고 특정 구조 요소가 들어갈 수있는 것들을 찾는 데 사용할 수 있습니다. 개구부는 얇은 픽셀 브리지로 연결된 객체들 사이의 틈을 열 수 있습니다. 침식에서 살아남은 모든 지역은 팽창에 의해 원래 크기로 복원됩니다.
What we will do in this tutorial
In this guide, we will:
- Insert 3 groups of sliders to control the quantity of HSV (Hue, Saturation and Value) of the image.
- Capture and process the image from the web cam removing noise in order to facilitate the object recognition.
- Finally using morphological operator such as erosion and dilation we can identify the objects using the contornous obtained after the image processing.
Getting Started
Let’s create a new JavaFX project. In Scene Builder we set the window elements so that we have a Border Pane with:
on RIGHT CENTER we can add a VBox. In this one we are going to need 6 sliders, the first couple will control hue, the next one saturation and finally brightness, with these sliders is possible to change the values of the HSV image.
새로운 JavaFX 프로젝트를 만들어 보겠습니다. Scene Builder에서 window 요소를 설정하여 다음과 같은 테두리 창을 갖습니다.<Label text="Hue Start" /> <Slider fx:id="hueStart" min="0" max="180" value="20" blockIncrement="1" /> <Label text="Hue Stop" /> <Slider fx:id="hueStop" min="0" max="180" value="50" blockIncrement="1" /> <Label text="Saturation Start" /> <Slider fx:id="saturationStart" min="0" max="255" value="60" blockIncrement="1" /> <Label text="Saturation Stop" /> <Slider fx:id="saturationStop" min="0" max="255" value="200" blockIncrement="1" /> <Label text="Value Start" /> <Slider fx:id="valueStart" min="0" max="255" value="50" blockIncrement="1" /> <Label text="Value Stop" /> <Slider fx:id="valueStop" min="0" max="255" value="255" blockIncrement="1" />
in the CENTER. we are going to put three ImageViews, the first one shows normal image from the web cam stream, the second one will show mask image and the last one will show morph image. The HBox is used to normal image and VBox to put the other ones.
가운데에. 우리는 세 개의 ImageView를 넣을 것입니다. 첫 번째 이미지는 웹 캠 스트림에서 일반 이미지를 보여주고 두 번째 이미지는 마스크 이미지를 보여주고 마지막 이미지는 모프 이미지를 보여줍니다. HBox는 일반 이미지와 VBox에 다른 이미지를 넣는 데 사용됩니다.<HBox alignment="CENTER" spacing="5"> <padding> <Insets right="10" left="10" /> </padding> <ImageView fx:id="originalFrame" /> <VBox alignment="CENTER" spacing="5"> <ImageView fx:id="maskImage" /> <ImageView fx:id="morphImage" /> </VBox> </HBox>
on the BOTTOM we can add the usual button to start/stop the stream and the current values HSV selected with the sliders.
하단에는 슬라이더로 선택한 스트림과 현재 값 HSV를 시작 / 정지하기 위해 일반적인 버튼을 추가 할 수 있습니다.<Button fx:id="cameraButton" alignment="center" text="Start camera" onAction="#startCamera" /> <Separator /> <Label fx:id="hsvCurrentValues" />
The gui will look something like this one:
GUI는 다음과 같이 보입니다.
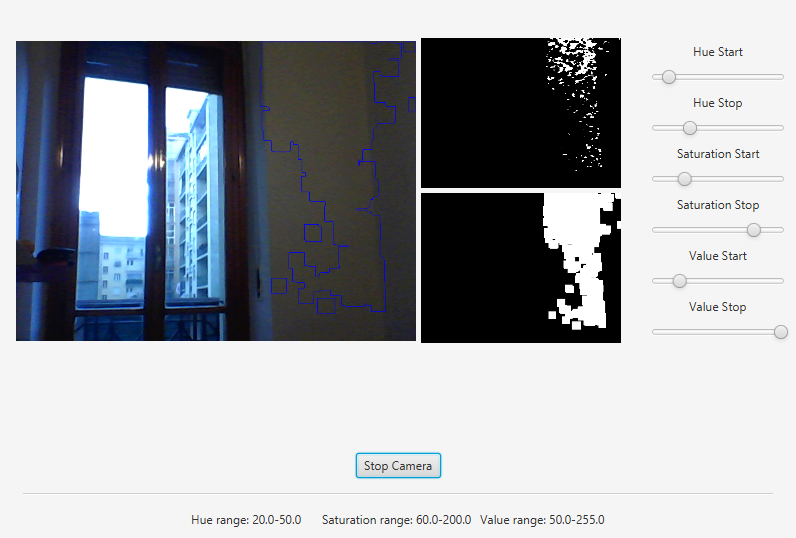
Image processing
In order to use the morphological operators and obtain good results we need to process the image and remove the noise, change the image to HSV allows to get the contours easily.
Remove noiseWe can remove some noise of the image using the method blur of the Imgproc class and then apply a conversion to HSV in order to facilitate the process of object recognition.
소음 제거Imgproc 클래스의 blur 메서드를 사용하여 이미지의 노이즈를 제거한 다음 HSV로 변환을 적용하여 개체 인식 프로세스를 용이하게 할 수 있습니다.Mat blurredImage = new Mat(); Mat hsvImage = new Mat(); Mat mask = new Mat(); Mat morphOutput = new Mat(); // remove some noise Imgproc.blur(frame, blurredImage, new Size(7, 7)); // convert the frame to HSV Imgproc.cvtColor(blurredImage, hsvImage, Imgproc.COLOR_BGR2HSV);
Values of HSV imageWith the sliders we can modify the values of the HSV Image, the image will be updtated in real time, that allows to increase or decrease the capactity to recognize object into the image. .
HSV 이미지 값슬라이더를 사용하여 HSV 이미지의 값을 수정할 수 있으므로 이미지가 실시간으로 업데이트되어 개체를 이미지에 인식하는 기능을 늘리거나 줄일 수 있습니다. .// get thresholding values from the UI // remember: H ranges 0-180, S and V range 0-255 Scalar minValues = new Scalar(this.hueStart.getValue(), this.saturationStart.getValue(), this.valueStart.getValue()); Scalar maxValues = new Scalar(this.hueStop.getValue(), this.saturationStop.getValue(), this.valueStop.getValue()); // show the current selected HSV range String valuesToPrint = "Hue range: " + minValues.val[0] + "-" + maxValues.val[0] + "\tSaturation range: " + minValues.val[1] + "-" + maxValues.val[1] + "\tValue range: " + minValues.val[2] + "-" + maxValues.val[2]; this.onFXThread(this.hsvValuesProp, valuesToPrint); // threshold HSV image to select tennis balls Core.inRange(hsvImage, minValues, maxValues, mask); // show the partial output this.onFXThread(maskProp, this.mat2Image(mask));
Morphological Operators
First of all we need to define the two matrices of morphological operator dilation and erosion, then with the methods erode and dilate of the class Imgproc we process the image twice in each operation, the result is the matrix morphOutput that will be the partial output.
// morphological operators
// dilate with large element, erode with small ones
 Mat dilateElement = Imgproc.getStructuringElement(Imgproc.MORPH_RECT, new Size(24, 24));
 Mat erodeElement = Imgproc.getStructuringElement(Imgproc.MORPH_RECT, new Size(12, 12));

 Imgproc.erode(mask, morphOutput, erodeElement);
 Imgproc.erode(mask, morphOutput, erodeElement);

 Imgproc.dilate(mask, morphOutput, dilateElement);
 Imgproc.dilate(mask, morphOutput, dilateElement);

 // show the partial output
 this.onFXThread(this.morphProp, this.mat2Image(morphOutput));
Object tracking
With the partial output obtained before we can use the method findContours of the class Imgpoc to get a matrix with the mapping of the objects recognized, then we draw the contours of these objects.
부분 출력은 Imgpoc 클래스의 findContours 메소드를 사용하여 인식 된 객체의 매핑이있는 행렬을 얻기 전에 얻을 수 있습니다. 그런 다음이 객체의 윤곽을 그립니다.
// init
List<MatOfPoint> contours = new ArrayList<>();
Mat hierarchy = new Mat();

// find contours
Imgproc.findContours(maskedImage, contours, hierarchy, Imgproc.RETR_CCOMP, Imgproc.CHAIN_APPROX_SIMPLE);

// if any contour exist...
if (hierarchy.size().height > 0 && hierarchy.size().width > 0)
{
        // for each contour, display it in blue
        for (int idx = 0; idx >= 0; idx = (int) hierarchy.get(0, idx)[0])
        {
                Imgproc.drawContours(frame, contours, idx, new Scalar(250, 0, 0));
        }
}
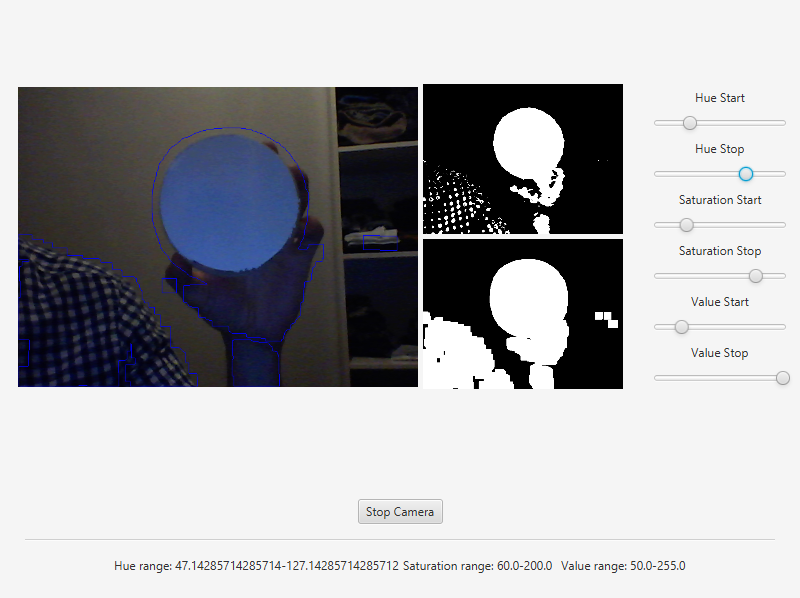
Finally we can get this results:

The source code of the entire tutorial is available on GitHub.
'DEV' 카테고리의 다른 글
| 정렬 알고리즘 시각화 JAVA 소스 (0) | 2017.12.14 |
|---|---|
| 카메라 캘리브레이션(Camera Calibration) 카메라 보정 개념 정리 (0) | 2017.12.10 |
| 7. Image Segmentation (이미지 분할) (0) | 2017.12.10 |
| 6. Face Detection and Tracking (얼굴 인식 및 추적) (0) | 2017.12.09 |
| 5. Fourier Transform (푸리에 변환) (1) | 2017.12.09 |
