Image Segmentation
Note
We assume that by now you have already read the previous tutorials. If not, please check previous tutorials at http://opencv-java-tutorials.readthedocs.org/en/latest/index.html. You can also find the source code and resources at https://github.com/opencv-java/
우리는 지금까지 이미 이전 튜토리얼을 읽었다 고 가정합니다. 그렇지 않은 경우 http://opencv-java-tutorials.readthedocs.org/en/latest/index.html에서 이전 자습서를 확인하십시오. https://github.com/opencv-java/에서 소스 코드와 리소스를 찾을 수도 있습니다.
Goal
In this tutorial we are going to create a JavaFX application where we can decide to apply to video stream captured from our web cam either a Canny edge detector or a trivial background removal using the two basic morphological operations: dilatation and erosion.
이 튜토리얼에서는 우리의 웹캠에서 캡쳐 한 비디오 스트림에 Canny 엣지 디텍터 또는 확장과 침식의 두 가지 기본 형태를 사용하는 사소한 배경 제거를 적용 할 수있는 JavaFX 애플리케이션을 만들 계획입니다.
Canny edge detector
The Canny edge detector is an edge detection operator that uses a multi-stage algorithm to detect a wide range of edges in images. It was developed by John F. Canny in 1986.
Canny Edge Detector는 다단계 알고리즘을 사용하여 이미지에서 다양한 범위의 가장자리를 감지하는 가장자리 감지 연산자입니다. 그것은 1986 년 John F. Canny가 개발했습니다.
- Canny edge detection is a four step process:
- A Gaussian blur is applied to clear any speckles and free the image of noise.
- A gradient operator is applied for obtaining the gradients’ intensity and direction.
- Non-maximum suppression determines if the pixel is a better candidate for an edge than its neighbors.
- Hysteresis thresholding finds where edges begin and end.
- The Canny algorithm contains a number of adjustable parameters, which can affect the computation time and effectiveness of the algorithm.
- The size of the Gaussian filter: the smoothing filter used in the first stage directly affects the results of the Canny algorithm. Smaller filters cause less blurring, and allow detection of small, sharp lines. A larger filter causes more blurring, smearing out the value of a given pixel over a larger area of the image.
- Thresholds: A threshold set too high can miss important information. On the other hand, a threshold set too low will falsely identify irrelevant information (such as noise) as important. It is difficult to give a generic threshold that works well on all images. No tried and tested approach to this problem yet exists.
For our purpose we are going to set the filter size to 3 and the threshold editable by a Slider.
우리는 필터 크기를 3으로 설정하고 슬라이더로 임계 값을 편집 할 것입니다.
Dilatation and Erosion
Dilation and erosion are the most basic morphological operations. Dilation adds pixels to the boundaries of objects in an image, while erosion removes pixels on object boundaries. The number of pixels added or removed from the objects in an image depends on the size and shape of the structuring element used to process the image. In the morphological dilation and erosion operations, the state of any given pixel in the output image is determined by applying a rule to the corresponding pixel and its neighbors in the input image. The rule used to process the pixels defines the operation as a dilation or an erosion.
팽창과 침식은 가장 기본적인 형태 학적 조작입니다. Dilation은 이미지의 오브젝트 경계에 픽셀을 추가하는 반면, 침식은 오브젝트 경계의 픽셀을 제거합니다. 이미지의 오브젝트에서 추가되거나 제거되는 픽셀의 수는 이미지를 처리하는 데 사용되는 구조 요소의 크기와 모양에 따라 다릅니다. 형태 학적 확장 및 침식 동작에서, 출력 이미지의 임의의 주어진 픽셀의 상태는 입력 이미지의 대응 픽셀 및 이웃 픽셀에 규칙을 적용하여 결정됩니다. 픽셀을 처리하는 데 사용되는 규칙은 조작을 확장 또는 침식으로 정의합니다.
Dilatation: the value of the output pixel is the maximum value of all the pixels in the input pixel’s neighborhood. In a binary image, if any of the pixels is set to the value 1, the output pixel is set to 1.
확대 : 출력 픽셀의 값은 입력 픽셀의 이웃에있는 모든 픽셀의 최대 값입니다. 이진 이미지에서 픽셀 중 하나가 값 1로 설정되면 출력 픽셀은 1로 설정됩니다.
Erosion: the value of the output pixel is the minimum value of all the pixels in the input pixel’s neighborhood. In a binary image, if any of the pixels is set to 0, the output pixel is set to 0.
침식 : 출력 픽셀의 값은 입력 픽셀의 이웃에있는 모든 픽셀의 최소값입니다. 이진 이미지에서 픽셀 중 하나가 0으로 설정되면 출력 픽셀은 0으로 설정됩니다.
What we will do in this tutorial
- In this guide, we will:
- Add a checkbox and a Slider to select and control the Canny edge detector.
- Use the Canny edge function provided by OpenCV.
- Use the Dilatation and erosion functions provided by OpenCV.
- Create a trivial background removal function.
- In this guide, we will:
- Add a checkbox and a Slider to select and control the Canny edge detector.
- Use the Canny edge function provided by OpenCV.
- Use the Dilatation and erosion functions provided by OpenCV.
- Create a trivial background removal function.
Getting Started
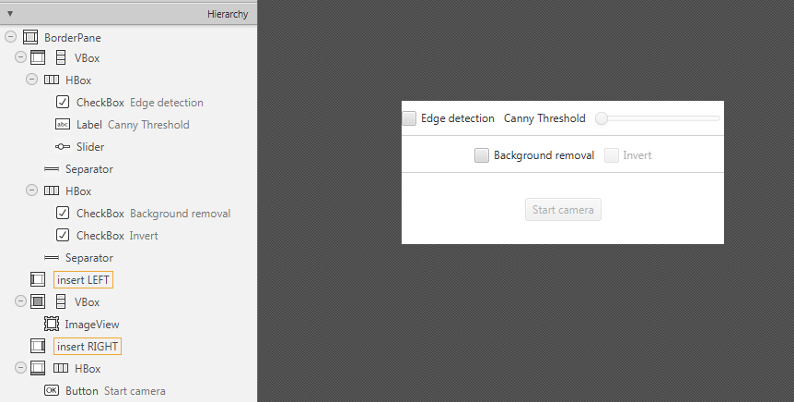
Let’s create a new JavaFX project. In Scene Builder set the windows element so that we have a Border Pane with:
새로운 JavaFX 프로젝트를 만들어 보겠습니다. Scene Builder에서 windows 요소를 설정하여 다음과 같은 테두리 창을 갖도록하십시오.
- on TOP a VBox containing two HBox, each one followed by a separator.
TOP에는 두 개의 HBox를 포함하는 VBox가 있고 그 뒤에 하나씩 구분 기호가옵니다.In the first HBox we are goning to need a checkbox and a slider, the first one is to select the Canny e.d. mode and the second one is going to be used to control the value of the threshold to be passed to the Canny e.d. function.
첫 번째 HBox에서는 체크 박스와 슬라이더가 필요합니다. 첫 번째 것은 Canny e.d를 선택하는 것입니다. 모드로 전환되고 두 번째 것은 임계 값을 제어하는 데 사용되어 Canny e.d.로 전달됩니다. 기능.<CheckBox fx:id="canny" onAction="#cannySelected" text="Edge detection"/>
<Label text="Canny Threshold" />
<Slider fx:id="threshold" disable="true" />
In the second HBox we need two checkboxes, the first one to select the Backgrond removal mode and the second one to say if we want to invert the algorithm (a sort of “foreground removal”).
두 번째 HBox에서 두 개의 체크 박스가 필요합니다. 첫 번째는 Backgrond 제거 모드를 선택하고 두 번째는 알고리즘을 반전시키려는 경우입니다 (일종의 "전경 제거").<CheckBox fx:id="dilateErode" onAction="#dilateErodeSelected" text="Background removal"/>
<CheckBox fx:id="inverse" text="Invert" disable="true"/>
- in the CENTRE we are going to put an ImageView for the web cam stream.
CENTER에서 우리는 웹캠 스트림을위한 ImageView를 넣을 것입니다.<ImageView fx:id="originalFrame" />
- on the BOTTOM we can add the usual button to start/stop the stream
하단에 우리는 스트림을 시작 / 정지하기 위해 보통 버튼을 추가 할 수 있습니다.<Button fx:id="cameraButton" alignment="center" text="Start camera" onAction="#startCamera" disable="true" />
The gui will look something like this one:
GUI는 다음과 같이 보입니다.
Let’s create a new JavaFX project. In Scene Builder set the windows element so that we have a Border Pane with:
새로운 JavaFX 프로젝트를 만들어 보겠습니다. Scene Builder에서 windows 요소를 설정하여 다음과 같은 테두리 창을 갖도록하십시오.
- on TOP a VBox containing two HBox, each one followed by a separator.
In the first HBox we are goning to need a checkbox and a slider, the first one is to select the Canny e.d. mode and the second one is going to be used to control the value of the threshold to be passed to the Canny e.d. function.
첫 번째 HBox에서는 체크 박스와 슬라이더가 필요합니다. 첫 번째 것은 Canny e.d를 선택하는 것입니다. 모드로 전환되고 두 번째 것은 임계 값을 제어하는 데 사용되어 Canny e.d.로 전달됩니다. 기능.<CheckBox fx:id="canny" onAction="#cannySelected" text="Edge detection"/> <Label text="Canny Threshold" /> <Slider fx:id="threshold" disable="true" />In the second HBox we need two checkboxes, the first one to select the Backgrond removal mode and the second one to say if we want to invert the algorithm (a sort of “foreground removal”).
두 번째 HBox에서 두 개의 체크 박스가 필요합니다. 첫 번째는 Backgrond 제거 모드를 선택하고 두 번째는 알고리즘을 반전시키려는 경우입니다 (일종의 "전경 제거").<CheckBox fx:id="dilateErode" onAction="#dilateErodeSelected" text="Background removal"/> <CheckBox fx:id="inverse" text="Invert" disable="true"/>
- in the CENTRE we are going to put an ImageView for the web cam stream.
<ImageView fx:id="originalFrame" />
- on the BOTTOM we can add the usual button to start/stop the stream
<Button fx:id="cameraButton" alignment="center" text="Start camera" onAction="#startCamera" disable="true" />
The gui will look something like this one:
GUI는 다음과 같이 보입니다.
Using the Canny edge detection
If we selected the Canny checkbox we can perform the method doCanny.
Canny 체크 박스를 선택하면 doCanny 메소드를 수행 할 수 있습니다.
if (this.canny.isSelected()){
    frame = this.doCanny(frame);
}
doCanny is a method that we define to execute the edge detection. First, we convert the image into a grayscale one and blur it with a filter of kernel size 3:
doCanny는 에지 감지를 실행하기 위해 정의하는 메소드입니다. 먼저, 이미지를 회색 음영으로 변환하고 커널 크기 3의 필터로 흐리게 만듭니다.
Imgproc.cvtColor(frame, grayImage, Imgproc.COLOR_BGR2GRAY);
Imgproc.blur(grayImage, detectedEdges, new Size(3, 3));
Second, we apply the OpenCV function Canny:
둘째, 우리는 OpenCV 함수 Canny를 적용합니다.
Imgproc.Canny(detectedEdges, detectedEdges, this.threshold.getValue(), this.threshold.getValue() * 3, 3, false);
- where the arguments are:
detectedEdges: Source image, grayscaledetectedEdges: Output of the detector (can be the same as the input)this.threshold.getValue(): The value entered by the user moving the Sliderthis.threshold.getValue() * 3: Set in the program as three times the lower threshold (following Canny’s recommendation)3: The size of the Sobel kernel to be used internallyfalse: a flag, indicating whether to use a more accurate calculation of the magnitude gradient.
Then we fill a dest image with zeros (meaning the image is completely black).
그런 다음 dest 이미지에 0을 채 웁니다 (이미지가 완전히 검은 색임을 의미).
Mat dest = new Mat();
Core.add(dest, Scalar.all(0), dest);
Finally, we will use the function copyTo to map only the areas of the image that are identified as edges (on a black background).
마지막으로, copyTo 함수를 사용하여 가장자리 (검정색 배경)로 식별되는 이미지 영역 만 매핑합니다.
frame.copyTo(dest, detectedEdges);
copyTo copies the src image onto dest. However, it will only copy the pixels in the locations where they have non-zero values.
copyTo는 src 이미지를 dest에 복사합니다. 그러나 픽셀 값이 0이 아닌 위치의 픽셀 만 복사합니다.
If we selected the Canny checkbox we can perform the method doCanny.
Canny 체크 박스를 선택하면 doCanny 메소드를 수행 할 수 있습니다.
if (this.canny.isSelected()){
frame = this.doCanny(frame);
}
doCanny is a method that we define to execute the edge detection. First, we convert the image into a grayscale one and blur it with a filter of kernel size 3:
doCanny는 에지 감지를 실행하기 위해 정의하는 메소드입니다. 먼저, 이미지를 회색 음영으로 변환하고 커널 크기 3의 필터로 흐리게 만듭니다.
Imgproc.cvtColor(frame, grayImage, Imgproc.COLOR_BGR2GRAY);
Imgproc.blur(grayImage, detectedEdges, new Size(3, 3));
Second, we apply the OpenCV function Canny:
둘째, 우리는 OpenCV 함수 Canny를 적용합니다.
Imgproc.Canny(detectedEdges, detectedEdges, this.threshold.getValue(), this.threshold.getValue() * 3, 3, false);
- where the arguments are:
detectedEdges: Source image, grayscaledetectedEdges: Output of the detector (can be the same as the input)this.threshold.getValue(): The value entered by the user moving the Sliderthis.threshold.getValue() * 3: Set in the program as three times the lower threshold (following Canny’s recommendation)3: The size of the Sobel kernel to be used internallyfalse: a flag, indicating whether to use a more accurate calculation of the magnitude gradient.
Then we fill a dest image with zeros (meaning the image is completely black).
그런 다음 dest 이미지에 0을 채 웁니다 (이미지가 완전히 검은 색임을 의미).
Mat dest = new Mat();
Core.add(dest, Scalar.all(0), dest);
Finally, we will use the function copyTo to map only the areas of the image that are identified as edges (on a black background).
마지막으로, copyTo 함수를 사용하여 가장자리 (검정색 배경)로 식별되는 이미지 영역 만 매핑합니다.
frame.copyTo(dest, detectedEdges);
copyTo copies the src image onto dest. However, it will only copy the pixels in the locations where they have non-zero values.
copyTo는 src 이미지를 dest에 복사합니다. 그러나 픽셀 값이 0이 아닌 위치의 픽셀 만 복사합니다.
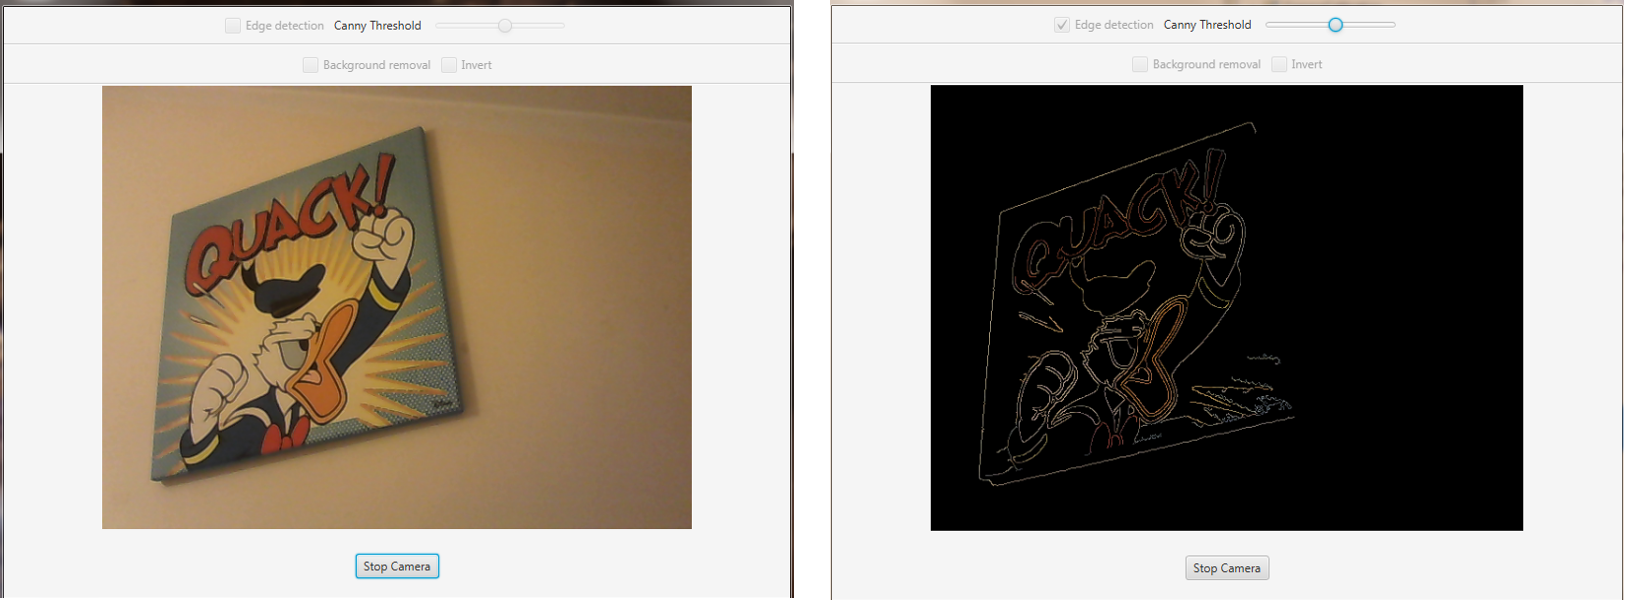
Canny Result
Using the Background Removal
If we selected the background removal checkbox we can perform the method doBackgroundRemoval
백그라운드 제거 확인란을 선택하면 doBackgroundRemoval 메소드를 수행 할 수 있습니다.
else if (this.dilateErode.isSelected())
{
    frame = this.doBackgroundRemoval(frame);
}
doBackgroundRemoval is a method that we define to execute the background removal.
doBackgroundRemoval은 백그라운드 제거를 실행하기 위해 정의하는 메소드입니다.
First we need to convert the current frame in HSV:
먼저 HSV에서 현재 프레임을 변환해야합니다.
hsvImg.create(frame.size(), CvType.CV_8U);
Imgproc.cvtColor(frame, hsvImg, Imgproc.COLOR_BGR2HSV);
Now let's split the three channels of the image:
Core.split(hsvImg, hsvPlanes);
Calculate the Hue component mean value:
색조 구성 요소의 평균값 계산 :
Imgproc.calcHist(hue, new MatOfInt(0), new Mat(), hist_hue, histSize, new MatOfFloat(0, 179));
for (int h = 0; h < 180; h++)
    average += (hist_hue.get(h, 0)[0] * h);
average = average / hsvImg.size().height / hsvImg.size().width;
If the background is uniform and fills most of the frame, its value should be close to mean just calculated. Then we can use the mean as the threshold to separate the background from the foreground, depending on the invert checkbox we need to perform a back(fore)ground removal:
배경이 일정하고 프레임의 대부분을 채우는 경우 해당 값은 방금 계산 된 평균에 가깝습니다. 그런 다음 평균을 임계 값으로 사용하여 백그라운드를 전경에서 분리 할 수 있습니다. 역전 체크 박스를 사용하면 전방 제거를 수행해야합니다.
 if (this.inverse.isSelected())
     Imgproc.threshold(hsvPlanes.get(0), thresholdImg, threshValue, 179.0, Imgproc.THRESH_BINARY_INV);
else
     Imgproc.threshold(hsvPlanes.get(0), thresholdImg, threshValue, 179.0, Imgproc.THRESH_BINARY);
Now we apply a low pass filter (blur) with a 5x5 kernel mask to enhance the result:
이제 5x5 커널 마스크로 로우 패스 필터 (흐림)를 적용하여 결과를 향상시킵니다.
Imgproc.blur(thresholdImg, thresholdImg, new Size(5, 5));
Finally apply the dilatation then the erosion (closing) to the image:
마지막으로 확장을 적용한 다음 이미지에 침식 (닫기)을 적용합니다.
Imgproc.dilate(thresholdImg, thresholdImg, new Mat(), new Point(-1, -1), 1);
Imgproc.erode(thresholdImg, thresholdImg, new Mat(), new Point(-1, -1), 3);
- The functions take these parameters:
thresholdImg input image;thresholdImg output image of the same size and type as thresholdImg;new Mat() a kernel;new Point(-1, -1) position of the anchor within the element; default value ( -1, -1 ) means that the anchor is at the element center.6 number of times the operation is applied.
함수는 다음 매개 변수를 사용합니다. - thresholdImg 입력 이미지; - thresholdImg와 같은 크기 및 유형의 이미지를 출력합니다. - new Mat () 커널; - 새로운 요소 내의 앵커의 Point (-1, -1) 위치. 기본값 (-1, -1)은 앵커가 요소 중심에 있음을 의미합니다. - 6 작업이 적용된 횟수입니다.
After the closing we need to do a new binary threshold:
종료 후 새로운 바이너리 임계 값을 수행해야합니다.
Imgproc.threshold(thresholdImg, thresholdImg, threshValue, 179.0, Imgproc.THRESH_BINARY);
At last, we can apply the image we’ve just obtained as a mask to the original frame:
마침내 우리는 방금 얻은 이미지를 마스크로 원래 프레임에 적용 할 수 있습니다.
Mat foreground = new Mat(frame.size(), CvType.CV_8UC3, new Scalar(255, 255, 255));
frame.copyTo(foreground, thresholdImg);
If we selected the background removal checkbox we can perform the method doBackgroundRemoval
백그라운드 제거 확인란을 선택하면 doBackgroundRemoval 메소드를 수행 할 수 있습니다.
else if (this.dilateErode.isSelected())
{
frame = this.doBackgroundRemoval(frame);
}
doBackgroundRemoval is a method that we define to execute the background removal.
doBackgroundRemoval은 백그라운드 제거를 실행하기 위해 정의하는 메소드입니다.
First we need to convert the current frame in HSV:
먼저 HSV에서 현재 프레임을 변환해야합니다.
hsvImg.create(frame.size(), CvType.CV_8U);
Imgproc.cvtColor(frame, hsvImg, Imgproc.COLOR_BGR2HSV);
Now let's split the three channels of the image:
Core.split(hsvImg, hsvPlanes);
Calculate the Hue component mean value:
색조 구성 요소의 평균값 계산 :
Imgproc.calcHist(hue, new MatOfInt(0), new Mat(), hist_hue, histSize, new MatOfFloat(0, 179));
for (int h = 0; h < 180; h++)
average += (hist_hue.get(h, 0)[0] * h);
average = average / hsvImg.size().height / hsvImg.size().width;
If the background is uniform and fills most of the frame, its value should be close to mean just calculated. Then we can use the mean as the threshold to separate the background from the foreground, depending on the invert checkbox we need to perform a back(fore)ground removal:
배경이 일정하고 프레임의 대부분을 채우는 경우 해당 값은 방금 계산 된 평균에 가깝습니다. 그런 다음 평균을 임계 값으로 사용하여 백그라운드를 전경에서 분리 할 수 있습니다. 역전 체크 박스를 사용하면 전방 제거를 수행해야합니다.
if (this.inverse.isSelected())
Imgproc.threshold(hsvPlanes.get(0), thresholdImg, threshValue, 179.0, Imgproc.THRESH_BINARY_INV);
else
Imgproc.threshold(hsvPlanes.get(0), thresholdImg, threshValue, 179.0, Imgproc.THRESH_BINARY);
Now we apply a low pass filter (blur) with a 5x5 kernel mask to enhance the result:
이제 5x5 커널 마스크로 로우 패스 필터 (흐림)를 적용하여 결과를 향상시킵니다.
Imgproc.blur(thresholdImg, thresholdImg, new Size(5, 5));
Finally apply the dilatation then the erosion (closing) to the image:
마지막으로 확장을 적용한 다음 이미지에 침식 (닫기)을 적용합니다.
Imgproc.dilate(thresholdImg, thresholdImg, new Mat(), new Point(-1, -1), 1);
Imgproc.erode(thresholdImg, thresholdImg, new Mat(), new Point(-1, -1), 3);
- The functions take these parameters:
thresholdImginput image;thresholdImgoutput image of the same size and type as thresholdImg;new Mat()a kernel;new Point(-1, -1)position of the anchor within the element; default value ( -1, -1 ) means that the anchor is at the element center.6number of times the operation is applied.
함수는 다음 매개 변수를 사용합니다.- thresholdImg 입력 이미지;- thresholdImg와 같은 크기 및 유형의 이미지를 출력합니다.- new Mat () 커널;- 새로운 요소 내의 앵커의 Point (-1, -1) 위치. 기본값 (-1, -1)은 앵커가 요소 중심에 있음을 의미합니다.- 6 작업이 적용된 횟수입니다.
After the closing we need to do a new binary threshold:
종료 후 새로운 바이너리 임계 값을 수행해야합니다.
Imgproc.threshold(thresholdImg, thresholdImg, threshValue, 179.0, Imgproc.THRESH_BINARY);
At last, we can apply the image we’ve just obtained as a mask to the original frame:
마침내 우리는 방금 얻은 이미지를 마스크로 원래 프레임에 적용 할 수 있습니다.
Mat foreground = new Mat(frame.size(), CvType.CV_8UC3, new Scalar(255, 255, 255));
frame.copyTo(foreground, thresholdImg);
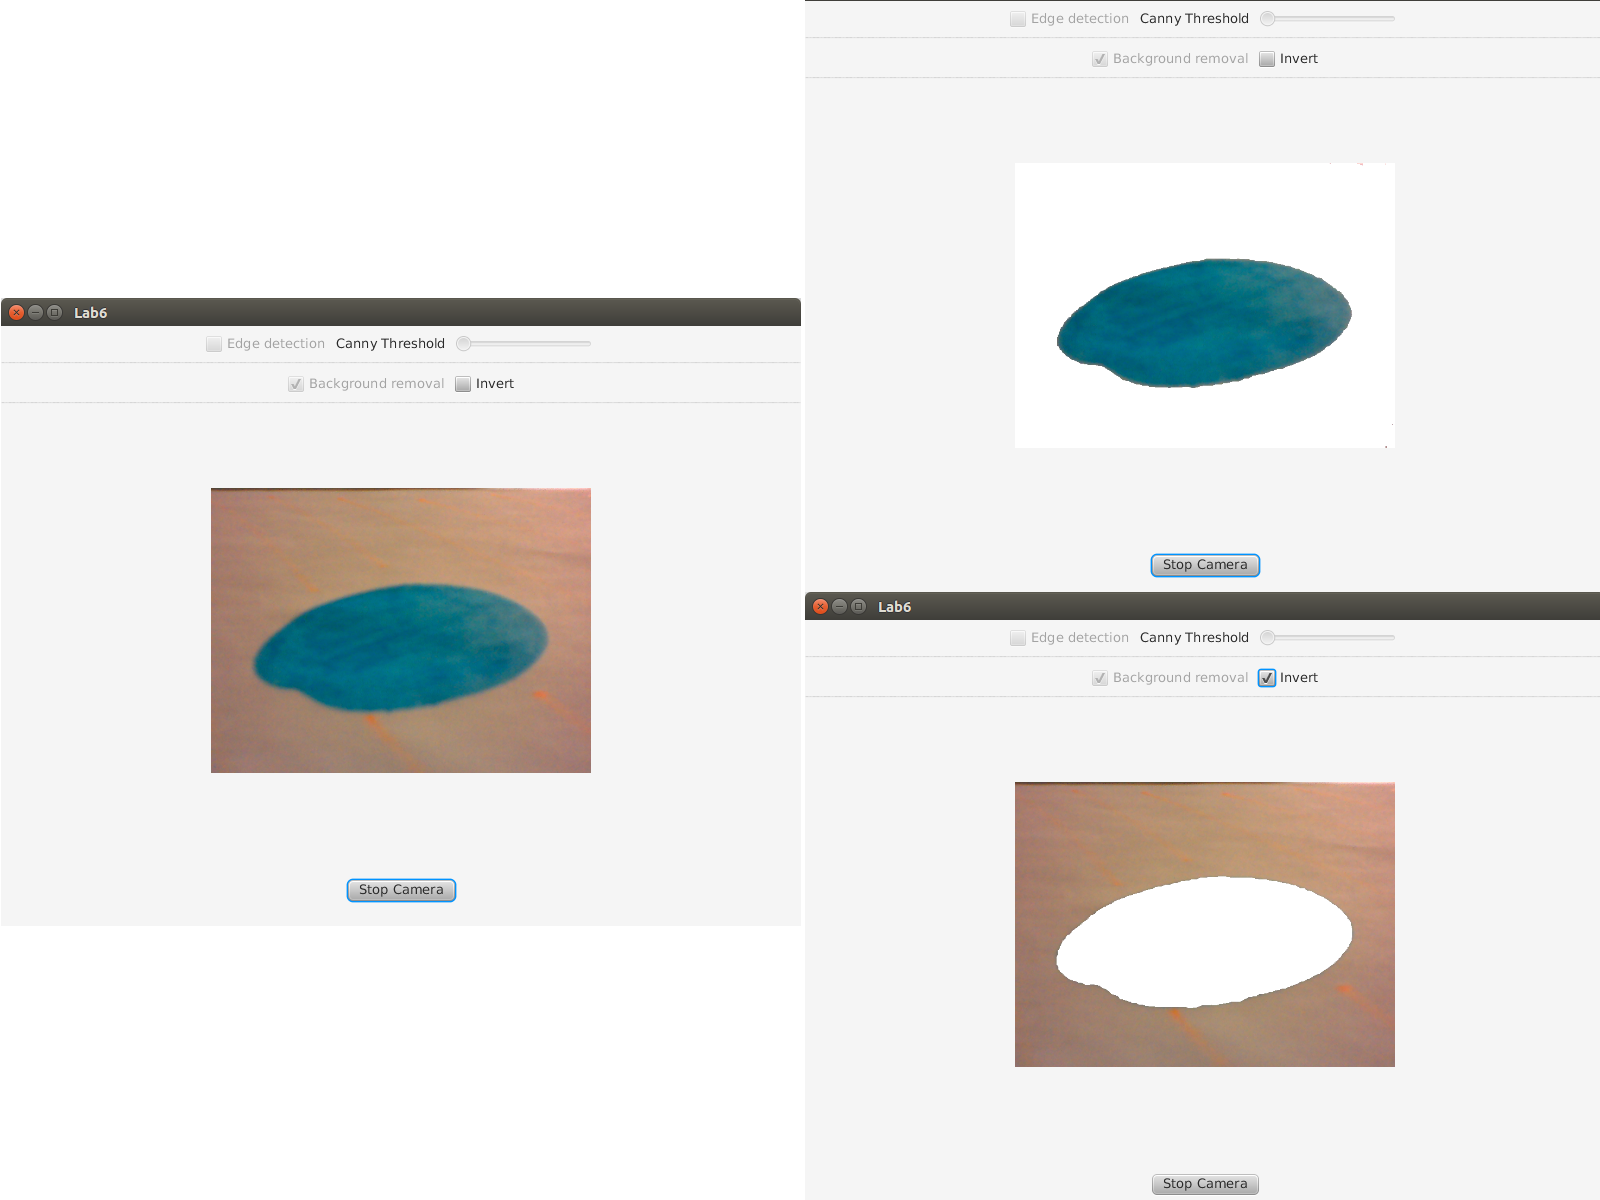
Background Removal Result
The source code of the entire tutorial is available on GitHub.
The source code of the entire tutorial is available on GitHub.
'DEV' 카테고리의 다른 글
| 9. Camera Calibration (카메라 보정) (0) | 2017.12.10 |
|---|---|
| 8. Object Detection (객체 감지) (0) | 2017.12.10 |
| 6. Face Detection and Tracking (얼굴 인식 및 추적) (0) | 2017.12.09 |
| 5. Fourier Transform (푸리에 변환) (1) | 2017.12.09 |
| 4. OpenCV Basics (OpenCV 기초) (0) | 2017.12.09 |