Face Detection and Tracking
Note
We assume that by now you have already read the previous tutorials. If not, please check previous tutorials at http://opencv-java-tutorials.readthedocs.org/en/latest/index.html. You can also find the source code and resources at https://github.com/opencv-java/
우리는 지금까지 이미 이전 튜토리얼을 읽었다 고 가정합니다. 그렇지 않은 경우 http://opencv-java-tutorials.readthedocs.org/en/latest/index.html에서 이전 자습서를 확인하십시오. https://github.com/opencv-java/에서 소스 코드와 리소스를 찾을 수도 있습니다.
Goal
In this tutorial we are going to use well-known classifiers that have been already trained and distributed by OpenCV in order to detect and track a moving face into a video stream.
이 튜토리얼에서는 움직이는 얼굴을 감지하여 비디오 스트림으로 추적하기 위해 OpenCV에서 이미 훈련되고 배포 된 잘 알려진 분류자를 사용하려고합니다.
In this tutorial we are going to use well-known classifiers that have been already trained and distributed by OpenCV in order to detect and track a moving face into a video stream.
이 튜토리얼에서는 움직이는 얼굴을 감지하여 비디오 스트림으로 추적하기 위해 OpenCV에서 이미 훈련되고 배포 된 잘 알려진 분류자를 사용하려고합니다.
Cascade Classifiers
The object recognition process (in our case, faces) is usually efficient if it is based on the features take-over which include additional information about the object class to be taken-over. In this tutorial we are going to use the Haar-like features and the Local Binary Patterns (LBP) in order to encode the contrasts highlighted by the human face and its spatial relations with the other objects present in the picture. Usually these features are extracted using a Cascade Classifier which has to be trained in order to recognize with precision different objects: the faces’ classification is going to be much different from the car’s classification.
개체 인식 프로세스 (이 경우 얼굴)는 일반적으로 인계받는 개체 클래스에 대한 추가 정보가 포함 된 기능 인계를 기반으로하는 경우 효율적입니다. 이 튜토리얼에서는 인간 얼굴로 강조 표시된 명암과 그림에있는 다른 객체와의 공간적 관계를 인코딩하기 위해 Haar와 같은 기능과 LBP (Local Binary Patterns)를 사용하려고합니다. 일반적으로 이러한 피쳐는 정밀도가 다른 물체를 인식하기 위해 훈련해야하는 캐스케이드 분류기를 사용하여 추출됩니다. 얼굴 분류는 자동차 분류와 크게 다를 것입니다.
What we will do in this tutorial
- In this guide, we will:
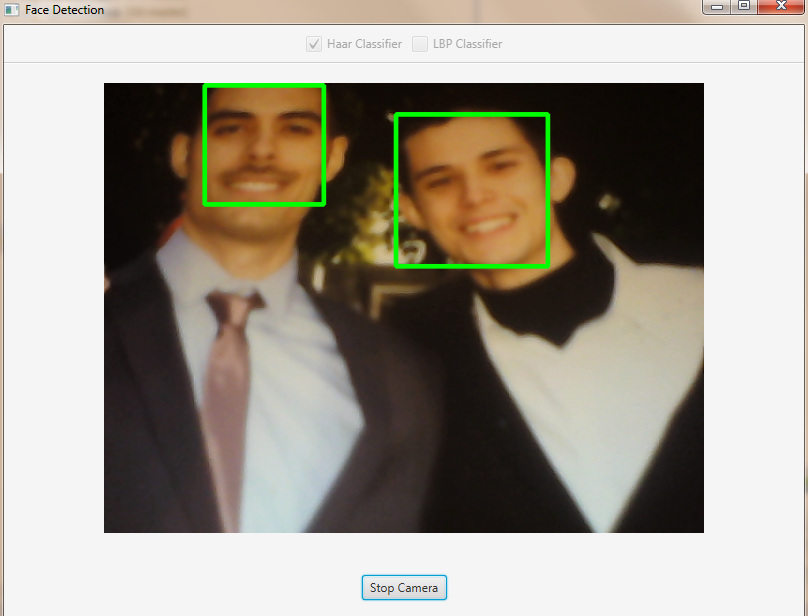
- Insert a checkbox to select the Haar Classifier, detect and track a face, and draw a green rectangle around the detected face.
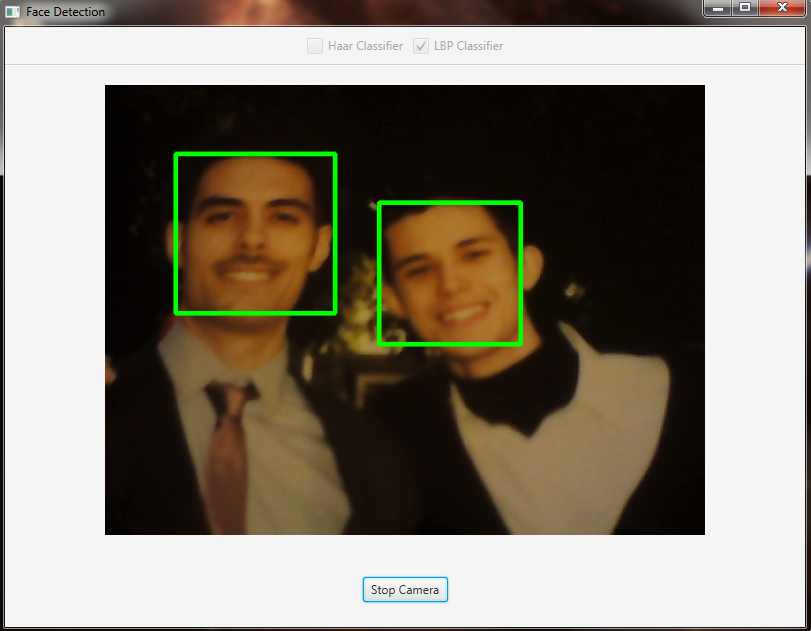
- Inesrt a checkbox to select the LBP Classifier, detect and track a face, and draw a green rectangle around the detected face.
이 가이드에서 우리는 :Haar Classifier를 선택하고, 얼굴을 탐지하고 추적하며, 탐지 된 얼굴 주위에 녹색 사각형을 그리기위한 확인란을 삽입하십시오.LBP 분류기를 선택하고 얼굴을 탐지 및 추적하며 감지 된 얼굴 주위에 녹색 사각형을 그리는 확인란을 선택하십시오.
- In this guide, we will:
- Insert a checkbox to select the Haar Classifier, detect and track a face, and draw a green rectangle around the detected face.
- Inesrt a checkbox to select the LBP Classifier, detect and track a face, and draw a green rectangle around the detected face.
이 가이드에서 우리는 :Haar Classifier를 선택하고, 얼굴을 탐지하고 추적하며, 탐지 된 얼굴 주위에 녹색 사각형을 그리기위한 확인란을 삽입하십시오.LBP 분류기를 선택하고 얼굴을 탐지 및 추적하며 감지 된 얼굴 주위에 녹색 사각형을 그리는 확인란을 선택하십시오.
Getting Started
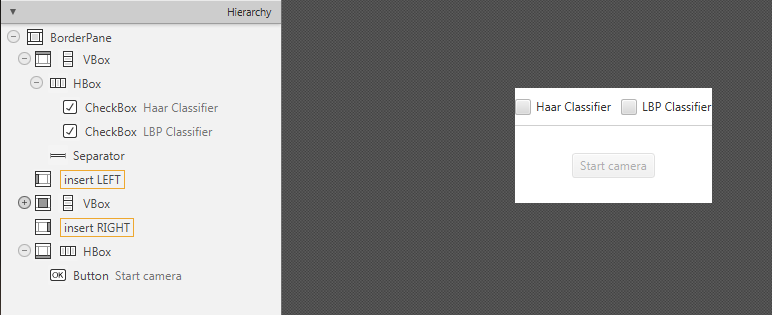
Let’s create a new JavaFX project. In Scene Builder set the windows element so that we have a Border Pane with:
새로운 JavaFX 프로젝트를 만들어 보겠습니다. Scene Builder에서 windows 요소를 설정하여 다음과 같은 테두리 창을 갖도록하십시오.
on TOP a VBox a HBox and a separator. In the HBox we are goning to need two checkboxes, the first one is to select the Haar Classifier and the second one is to select the LBP Classifier.
TOP에 VBox에 HBox와 분리 기호를 붙입니다. HBox에서는 두 개의 확인란이 필요합니다. 첫 번째는 Haar Classifier를 선택하는 것이고 두 번째는 LBP Classifier를 선택하는 것입니다.
<CheckBox fx:id="haarClassifier" onAction="#haarSelected" text="Haar Classifier"/>
<CheckBox fx:id="lbpClassifier" onAction="#lbpSelected" text="LBP Classifier"/>
in the CENTRE we are going to put an ImageView for the web cam stream.
CENTER에서 우리는 웹캠 스트림을위한 ImageView를 넣을 것입니다.
<ImageView fx:id="originalFrame" />
on the BOTTOM we can add the usual button to start/stop the stream
하단에 우리는 스트림을 시작 / 정지하기 위해 보통 버튼을 추가 할 수 있습니다.
<Button fx:id="cameraButton" alignment="center" text="Start camera" onAction="#startCamera" disable="true" />
The gui will look something like this one:
GUI는 다음과 같이 보입니다.
Let’s create a new JavaFX project. In Scene Builder set the windows element so that we have a Border Pane with:
새로운 JavaFX 프로젝트를 만들어 보겠습니다. Scene Builder에서 windows 요소를 설정하여 다음과 같은 테두리 창을 갖도록하십시오.
on TOP a VBox a HBox and a separator. In the HBox we are goning to need two checkboxes, the first one is to select the Haar Classifier and the second one is to select the LBP Classifier.
TOP에 VBox에 HBox와 분리 기호를 붙입니다. HBox에서는 두 개의 확인란이 필요합니다. 첫 번째는 Haar Classifier를 선택하는 것이고 두 번째는 LBP Classifier를 선택하는 것입니다.
<CheckBox fx:id="haarClassifier" onAction="#haarSelected" text="Haar Classifier"/> <CheckBox fx:id="lbpClassifier" onAction="#lbpSelected" text="LBP Classifier"/>
in the CENTRE we are going to put an ImageView for the web cam stream.
CENTER에서 우리는 웹캠 스트림을위한 ImageView를 넣을 것입니다.
<ImageView fx:id="originalFrame" />
on the BOTTOM we can add the usual button to start/stop the stream
하단에 우리는 스트림을 시작 / 정지하기 위해 보통 버튼을 추가 할 수 있습니다.
<Button fx:id="cameraButton" alignment="center" text="Start camera" onAction="#startCamera" disable="true" />
The gui will look something like this one:
GUI는 다음과 같이 보입니다.
Loading the Classifiers
First of all we need to add a folder resource to our project and put the classifiers in it. In order to use the classifiers we need to load them from the resource folder, so every time that we check one of the two checkboxes we will load the correct classifier. To do so, let’s implement the OnActionmethods we already declared before:
먼저 프로젝트에 폴더 리소스를 추가하고 분류자를 프로젝트에 추가해야합니다. 분류자를 사용하려면 리소스 폴더에서 분류자를로드해야하므로 두 개의 확인란 중 하나를 선택할 때마다 올바른 분류자를로드합니다. 이렇게하기 전에 앞서 선언 한 OnAction 메소드를 구현해 보겠습니다.
haarSelectedinside this method we are going to load the desired Haar Classifier (e.g. haarcascade_frontalface_alt.xml) as follows:
haarSelected
이 메소드 내에서 다음과 같이 원하는 Haar Classifier (예 : haarcascade_frontalface_alt.xml)를로드합니다.
this.checkboxSelection("resources/lbpcascades/haarcascade_frontalface_alt.xml");
...
private void checkboxSelection(String... classifierPath)
{
        // load the classifier(s)
        for (String xmlClassifier : classifierPath)
        {
                this.faceCascade.load(xmlClassifier);
        }

        // now the capture can start
        this.cameraButton.setDisable(false);
}
lbpSelectedfor the LPB we can use the same method and change the path of the classifier to be loaded:
lbpSelected
LPB의 경우 동일한 메소드를 사용하여로드 할 분류 기준의 경로를 변경할 수 있습니다.
this.checkboxSelection("resources/lbpcascades/lbpcascade_frontalface.xml");
First of all we need to add a folder resource to our project and put the classifiers in it. In order to use the classifiers we need to load them from the resource folder, so every time that we check one of the two checkboxes we will load the correct classifier. To do so, let’s implement the OnActionmethods we already declared before:
먼저 프로젝트에 폴더 리소스를 추가하고 분류자를 프로젝트에 추가해야합니다. 분류자를 사용하려면 리소스 폴더에서 분류자를로드해야하므로 두 개의 확인란 중 하나를 선택할 때마다 올바른 분류자를로드합니다. 이렇게하기 전에 앞서 선언 한 OnAction 메소드를 구현해 보겠습니다.
haarSelectedinside this method we are going to load the desired Haar Classifier (e.g.
haarcascade_frontalface_alt.xml) as follows:haarSelected
이 메소드 내에서 다음과 같이 원하는 Haar Classifier (예 : haarcascade_frontalface_alt.xml)를로드합니다.
this.checkboxSelection("resources/lbpcascades/haarcascade_frontalface_alt.xml"); ... private void checkboxSelection(String... classifierPath) { // load the classifier(s) for (String xmlClassifier : classifierPath) { this.faceCascade.load(xmlClassifier); } // now the capture can start this.cameraButton.setDisable(false); }
lbpSelectedfor the LPB we can use the same method and change the path of the classifier to be loaded:
lbpSelected
LPB의 경우 동일한 메소드를 사용하여로드 할 분류 기준의 경로를 변경할 수 있습니다.
this.checkboxSelection("resources/lbpcascades/lbpcascade_frontalface.xml");
Detection and Tracking
Once we’ve loaded the classifiers we are ready to start the detection; we are going to implement the detection in the detectAndDisplay method. First of all we need to convert the frame in grayscale and equalize the histogram to improve the results:
탐지 및 추적
분류기를로드하면 탐지를 시작할 준비가됩니다. 우리는 detectAndDisplay 메서드에서 탐지를 구현하려고합니다. 우선 우리는 그레이 스케일로 프레임을 변환하고 히스토그램을 균등하게하여 결과를 개선해야합니다.
Imgproc.cvtColor(frame, grayFrame, Imgproc.COLOR_BGR2GRAY);
Imgproc.equalizeHist(grayFrame, grayFrame);
Then we have to set the minimum size of the face to be detected (this required is need in the actual detection function). Let’s set the minimum size as the 20% of the frame height:
그런 다음 감지 할 얼굴의 최소 크기를 설정해야합니다 (실제 감지 기능에서 필요합니다). 최소 크기를 프레임 높이의 20 %로 설정합시다.
if (this.absoluteFaceSize == 0)
{
    int height = grayFrame.rows();
    if (Math.round(height * 0.2f) > 0)
    {
            this.absoluteFaceSize = Math.round(height * 0.2f);
    }
}
Now we can start the detection:
이제 탐지를 시작할 수 있습니다.
this.faceCascade.detectMultiScale(grayFrame, faces, 1.1, 2, 0 | Objdetect.CASCADE_SCALE_IMAGE, new Size(this.absoluteFaceSize, this.absoluteFaceSize), new Size());
The detectMultiScale function detects objects of different sizes in the input image. The detected objects are returned as a list of rectangles. The parameters are:
detectMultiScale 함수는 입력 이미지에서 크기가 다른 객체를 감지합니다. 검출 된 오브젝트는 직사각형의리스트로서 돌려 주어집니다. 매개 변수는 다음과 같습니다.
- image Matrix of the type CV_8U containing an image where objects are detected.
- objects Vector of rectangles where each rectangle contains the detected object.
- scaleFactor Parameter specifying how much the image size is reduced at each image scale.
- minNeighbors Parameter specifying how many neighbors each candidate rectangle should have to retain it.
- flags Parameter with the same meaning for an old cascade as in the function cvHaarDetectObjects. It is not used for a new cascade.
- minSize Minimum possible object size. Objects smaller than that are ignored.
- maxSize Maximum possible object size. Objects larger than that are ignored.
- 이미지가있는 이미지가 포함 된 CV_8U 유형의 행렬입니다.
- objects 각 사각형에 감지 된 객체가 들어있는 사각형의 벡터입니다.
- scaleFactor 각 이미지 크기에서 이미지 크기를 얼마나 줄일 것인지 지정하는 매개 변수입니다.
- minNeighbors 각 후보 사각형을 유지해야하는 이웃 수를 지정하는 매개 변수입니다.
- flags cvHaarDetectObjects 함수에서와 같이 이전 단계와 동일한 의미를 갖는 매개 변수. 새로운 계단식으로 사용되지 않습니다.
- minSize 가능한 최소 오브젝트 크기. 그보다 작은 객체는 무시됩니다.
- maxSize 가능한 오브젝트의 최대 크기. 그보다 큰 객체는 무시됩니다.
So the result of the detection is going to be in the objects parameter or in our case faces.
따라서 탐지 결과는 객체 매개 변수 또는 우리의 경우에있을 것입니다.
Let’s put this result in an array of rects and draw them on the frame, by doing so we can display the detected face are:
이 결과를 직사각형의 배열에 넣고 프레임에 그려 넣으면 감지 된 얼굴을 표시 할 수 있습니다.
Rect[] facesArray = faces.toArray();
for (int i = 0; i < facesArray.length; i++)
    Imgproc.rectangle(frame, facesArray[i].tl(), facesArray[i].br(), new Scalar(0, 255, 0, 255), 3);
As you can see we selected the color green with a transparent background: Scalar(0, 255, 0, 255)..tl() and .br() stand for top-left and bottom-right and they represents the two opposite vertexes. The last parameter just set the thickness of the rectangle’s border.
우리가 볼 수 있듯이 투명한 배경을 가진 녹색을 선택했습니다 : 스칼라 (0, 255, 0, 255) .. tl ()과 .br ()는 왼쪽 위와 오른쪽 아래를 나타내며 두 개의 반대 정점을 나타냅니다 . 마지막 매개 변수는 직사각형 테두리의 두께를 설정합니다.
The tracking part can be implemented by calling the detectAndDisplay method for each frame.
추적 부분은 각 프레임에 대해 detectAndDisplay 메서드를 호출하여 구현할 수 있습니다.
The source code of the entire tutorial is available on GitHub.
Once we’ve loaded the classifiers we are ready to start the detection; we are going to implement the detection in the detectAndDisplay method. First of all we need to convert the frame in grayscale and equalize the histogram to improve the results:
탐지 및 추적
분류기를로드하면 탐지를 시작할 준비가됩니다. 우리는 detectAndDisplay 메서드에서 탐지를 구현하려고합니다. 우선 우리는 그레이 스케일로 프레임을 변환하고 히스토그램을 균등하게하여 결과를 개선해야합니다.
Imgproc.cvtColor(frame, grayFrame, Imgproc.COLOR_BGR2GRAY);
Imgproc.equalizeHist(grayFrame, grayFrame);
Then we have to set the minimum size of the face to be detected (this required is need in the actual detection function). Let’s set the minimum size as the 20% of the frame height:
그런 다음 감지 할 얼굴의 최소 크기를 설정해야합니다 (실제 감지 기능에서 필요합니다). 최소 크기를 프레임 높이의 20 %로 설정합시다.
if (this.absoluteFaceSize == 0)
{
int height = grayFrame.rows();
if (Math.round(height * 0.2f) > 0)
{
this.absoluteFaceSize = Math.round(height * 0.2f);
}
}
Now we can start the detection:
이제 탐지를 시작할 수 있습니다.
this.faceCascade.detectMultiScale(grayFrame, faces, 1.1, 2, 0 | Objdetect.CASCADE_SCALE_IMAGE, new Size(this.absoluteFaceSize, this.absoluteFaceSize), new Size());
The detectMultiScale function detects objects of different sizes in the input image. The detected objects are returned as a list of rectangles. The parameters are:
detectMultiScale 함수는 입력 이미지에서 크기가 다른 객체를 감지합니다. 검출 된 오브젝트는 직사각형의리스트로서 돌려 주어집니다. 매개 변수는 다음과 같습니다.
- image Matrix of the type CV_8U containing an image where objects are detected.
- objects Vector of rectangles where each rectangle contains the detected object.
- scaleFactor Parameter specifying how much the image size is reduced at each image scale.
- minNeighbors Parameter specifying how many neighbors each candidate rectangle should have to retain it.
- flags Parameter with the same meaning for an old cascade as in the function cvHaarDetectObjects. It is not used for a new cascade.
- minSize Minimum possible object size. Objects smaller than that are ignored.
- maxSize Maximum possible object size. Objects larger than that are ignored.
- 이미지가있는 이미지가 포함 된 CV_8U 유형의 행렬입니다.
- objects 각 사각형에 감지 된 객체가 들어있는 사각형의 벡터입니다.
- scaleFactor 각 이미지 크기에서 이미지 크기를 얼마나 줄일 것인지 지정하는 매개 변수입니다.
- minNeighbors 각 후보 사각형을 유지해야하는 이웃 수를 지정하는 매개 변수입니다.
- flags cvHaarDetectObjects 함수에서와 같이 이전 단계와 동일한 의미를 갖는 매개 변수. 새로운 계단식으로 사용되지 않습니다.
- minSize 가능한 최소 오브젝트 크기. 그보다 작은 객체는 무시됩니다.
- maxSize 가능한 오브젝트의 최대 크기. 그보다 큰 객체는 무시됩니다.
So the result of the detection is going to be in the objects parameter or in our case faces.
따라서 탐지 결과는 객체 매개 변수 또는 우리의 경우에있을 것입니다.
Let’s put this result in an array of rects and draw them on the frame, by doing so we can display the detected face are:
이 결과를 직사각형의 배열에 넣고 프레임에 그려 넣으면 감지 된 얼굴을 표시 할 수 있습니다.
Rect[] facesArray = faces.toArray();
for (int i = 0; i < facesArray.length; i++)
Imgproc.rectangle(frame, facesArray[i].tl(), facesArray[i].br(), new Scalar(0, 255, 0, 255), 3);
As you can see we selected the color green with a transparent background: Scalar(0, 255, 0, 255)..tl() and .br() stand for top-left and bottom-right and they represents the two opposite vertexes. The last parameter just set the thickness of the rectangle’s border.
우리가 볼 수 있듯이 투명한 배경을 가진 녹색을 선택했습니다 : 스칼라 (0, 255, 0, 255) .. tl ()과 .br ()는 왼쪽 위와 오른쪽 아래를 나타내며 두 개의 반대 정점을 나타냅니다 . 마지막 매개 변수는 직사각형 테두리의 두께를 설정합니다.
The tracking part can be implemented by calling the detectAndDisplay method for each frame.
추적 부분은 각 프레임에 대해 detectAndDisplay 메서드를 호출하여 구현할 수 있습니다.
The source code of the entire tutorial is available on GitHub.
'DEV' 카테고리의 다른 글
| 8. Object Detection (객체 감지) (0) | 2017.12.10 |
|---|---|
| 7. Image Segmentation (이미지 분할) (0) | 2017.12.10 |
| 5. Fourier Transform (푸리에 변환) (1) | 2017.12.09 |
| 4. OpenCV Basics (OpenCV 기초) (0) | 2017.12.09 |
| 3. Your First JavaFX Application with OpenCV (OpenCV를 사용한 첫 번째 JavaFX 응용 프로그램) (0) | 2017.12.09 |