Your First Java Application with OpenCV
Note
We assume that by now you have already read the previous tutorials. If not, please check previous tutorials at http://opencv-java-tutorials.readthedocs.org/en/latest/index.html. You can also find the source code and resources at https://github.com/opencv-java/
우리는 지금까지 이미 이전 튜토리얼을 읽었다 고 가정합니다. 그렇지 않은 경우 http://opencv-java-tutorials.readthedocs.org/en/latest/index.html에서 이전 자습서를 확인하십시오. https://github.com/opencv-java/에서 소스 코드와 리소스를 찾을 수도 있습니다.
A Java application with OpenCV
This tutorial will guide you through the creation of a simple Java console application using the OpenCV library in Eclipse.
이 튜토리얼은 Eclipse에서 OpenCV 라이브러리를 사용하여 간단한 Java 콘솔 애플리케이션을 작성하는 방법을 안내합니다.
This tutorial will guide you through the creation of a simple Java console application using the OpenCV library in Eclipse.
What we will do in this tutorial
- In this guide, we will:
-
- Create a new Java Project
- Add a User Library to the project
- Write some OpenCV code
- Build and Run the application
- In this guide, we will:
-
- Create a new Java Project
- Add a User Library to the project
- Write some OpenCV code
- Build and Run the application
이 가이드에서 우리는 :
- 새 Java 프로젝트 만들기
- 프로젝트에 사용자 라이브러리 추가
- OpenCV 코드 작성
- 응용 프로그램 빌드 및 실행
Create a New Project
Open Eclipse and create a new Java project; open the File menu, go to New and click on Java Project.
Eclipse를 열고 새로운 Java 프로젝트를 만듭니다. File 메뉴를 열고 New로 이동하여 Java Project를 클릭한다.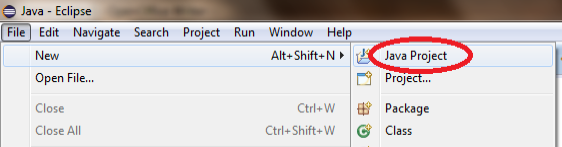
In the New Java Project dialog write the name of your project and click on Finish.
New Java Project 대화 상자에서 프로젝트 이름을 적고 Finish를 클릭한다.
Open Eclipse and create a new Java project; open the File menu, go to New and click on Java Project.
In the New Java Project dialog write the name of your project and click on Finish.
Add a User Library
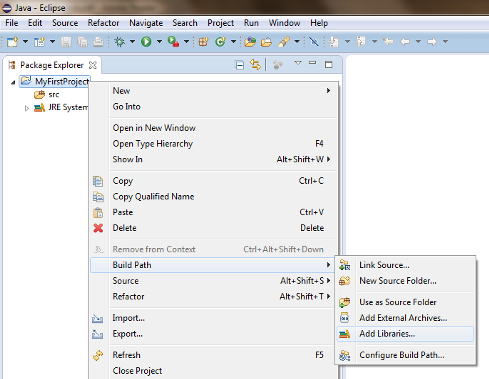
If you followed the previous tutorial (Installing OpenCV for Java), you should already have the OpenCV library set in your workspace’s user libraries; if not please check out the previous tutorial. Now you should be ready to add the library to your project. Inside Eclipse’s Package Explorer just right-click on your project’s folder and go to Build Path --> Add Libraries....
이전 튜토리얼 (OpenCV for Java 설치)을 따라 갔다면 이미 작업 공간의 사용자 라이브러리에 OpenCV 라이브러리가 설정되어 있어야합니다. 그렇지 않은 경우 이전 자습서를 확인하십시오. 이제 프로젝트에 라이브러리를 추가 할 준비가되었습니다. Eclipse의 패키지 탐색기에서 프로젝트 폴더를 마우스 오른쪽 버튼으로 클릭하고 경로 작성 -> 라이브러리 추가 ...로 이동하십시오.
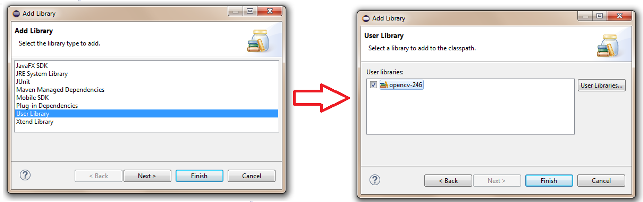
Select User Libraries and click on Next, check the checkbox of the OpenCV library and click Finish.
사용자 라이브러리를 선택하고 다음을 클릭하고 OpenCV 라이브러리의 확인란을 선택하고 마침을 클릭하십시오.
If you followed the previous tutorial (Installing OpenCV for Java), you should already have the OpenCV library set in your workspace’s user libraries; if not please check out the previous tutorial. Now you should be ready to add the library to your project. Inside Eclipse’s Package Explorer just right-click on your project’s folder and go to Build Path --> Add Libraries....
이전 튜토리얼 (OpenCV for Java 설치)을 따라 갔다면 이미 작업 공간의 사용자 라이브러리에 OpenCV 라이브러리가 설정되어 있어야합니다. 그렇지 않은 경우 이전 자습서를 확인하십시오. 이제 프로젝트에 라이브러리를 추가 할 준비가되었습니다. Eclipse의 패키지 탐색기에서 프로젝트 폴더를 마우스 오른쪽 버튼으로 클릭하고 경로 작성 -> 라이브러리 추가 ...로 이동하십시오.
Select User Libraries and click on Next, check the checkbox of the OpenCV library and click Finish.
사용자 라이브러리를 선택하고 다음을 클릭하고 OpenCV 라이브러리의 확인란을 선택하고 마침을 클릭하십시오.
Create a simple application
Now add a new Class to your project by right-clicking on your project’s folder and go to New --> Class. Write a name of your choice for both the package and the class then click on Finish. Now we are ready to write the code of our first application. Let’s start by defining the main method:
이제 프로젝트의 폴더를 마우스 오른쪽 버튼으로 클릭하고 New -> Class로 이동하여 프로젝트에 새 Class를 추가하십시오. 패키지와 클래스 모두에 대해 원하는 이름을 작성한 다음 마침을 클릭하십시오. 이제 첫 번째 애플리케이션 코드를 작성할 준비가되었습니다. main 메소드를 정의 해 보겠습니다.public class HelloCV {
public static void main(String[] args){
System.loadLibrary(Core.NATIVE_LIBRARY_NAME);
Mat mat = Mat.eye(3, 3, CvType.CV_8UC1);
System.out.println("mat = " + mat.dump());
}
}
First of all we need to load the OpenCV Native Library previously set on our project.
우선 우리 프로젝트에서 이전에 설정 한 OpenCV 네이티브 라이브러리를로드해야합니다.System.loadLibrary(Core.NATIVE_LIBRARY_NAME);
Then we can define a new Mat.
그런 다음 새로운 매트를 정의 할 수 있습니다.Note
The class Mat represents an n-dimensional dense numerical single-channel or multi-channel array. It can be used to store real or complex-valued vectors and matrices, grayscale or color images, voxel volumes, vector fields, point clouds, tensors, histograms. For more details check out the OpenCV page.
클래스 Mat는 n 차원의 밀집 형 수치 단일 채널 또는 다중 채널 배열을 나타냅니다. 실수 또는 복소수 값의 벡터 및 행렬, 그레이 스케일 또는 컬러 이미지, 복셀 체적, 벡터 필드, 점군, 텐서, 히스토그램을 저장하는 데 사용할 수 있습니다. 자세한 내용은 OpenCV 페이지를 확인하십시오.Mat mat = Mat.eye(3, 3, CvType.CV_8UC1);
The Mat.eye represents a identity matrix, we set the dimensions of it (3x3) and the type of its elements.
Mat.eye는 단위 행렬을 나타내며, 차원 (3x3)과 요소의 유형을 설정합니다.As you can notice, if you leave the code just like this, you will get some error; this is due to the fact that eclipse can’t resolve some variables. You can locate your mouse cursor on the words that seem to be errors and wait for a dialog to pop up and click on the voice Import.... If you do that for all the variables we have added to the code the following rows:
알 수 있듯이 코드를 이와 같이두면 오류가 발생합니다. 이것은 eclipse가 일부 변수를 해결할 수 없다는 사실 때문입니다. 오류가있는 단어에 마우스 커서를 놓고 대화 상자가 나타나서 음성 가져 오기 ...를 클릭 할 때까지 기다릴 수 있습니다. 모든 변수에 대해 이렇게하면 다음 행에 코드가 추가됩니다.
추신 : eclipse 단축키 'ctrl + shift + o' 해주면 자동으로 import 되어집니다.import org.opencv.core.Core;
import org.opencv.core.CvType;
import org.opencv.core.Mat;
We can now try to build and run our application by clicking on the Run button. You should have the following output:
이제 실행 버튼을 클릭하여 애플리케이션을 작성하고 실행할 수 있습니다. 다음과 같은 결과가 있어야합니다.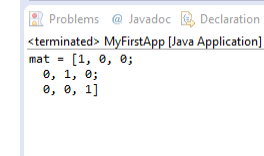 오류발생 CASE
The whole source code is available on GitHub.
전체 소스 코드는 GitHub에서 사용할 수 있습니다.
Now add a new Class to your project by right-clicking on your project’s folder and go to New --> Class. Write a name of your choice for both the package and the class then click on Finish. Now we are ready to write the code of our first application. Let’s start by defining the main method:
public class HelloCV {
        public static void main(String[] args){
                System.loadLibrary(Core.NATIVE_LIBRARY_NAME);
                Mat mat = Mat.eye(3, 3, CvType.CV_8UC1);
                System.out.println("mat = " + mat.dump());
        }
}
First of all we need to load the OpenCV Native Library previously set on our project.
System.loadLibrary(Core.NATIVE_LIBRARY_NAME);
Then we can define a new Mat.
Note
The class Mat represents an n-dimensional dense numerical single-channel or multi-channel array. It can be used to store real or complex-valued vectors and matrices, grayscale or color images, voxel volumes, vector fields, point clouds, tensors, histograms. For more details check out the OpenCV page.
Mat mat = Mat.eye(3, 3, CvType.CV_8UC1);
The Mat.eye represents a identity matrix, we set the dimensions of it (3x3) and the type of its elements.
As you can notice, if you leave the code just like this, you will get some error; this is due to the fact that eclipse can’t resolve some variables. You can locate your mouse cursor on the words that seem to be errors and wait for a dialog to pop up and click on the voice Import.... If you do that for all the variables we have added to the code the following rows:
import org.opencv.core.Core;
import org.opencv.core.CvType;
import org.opencv.core.Mat;
We can now try to build and run our application by clicking on the Run button. You should have the following output:


The whole source code is available on GitHub.
'DEV' 카테고리의 다른 글
| 4. OpenCV Basics (OpenCV 기초) (0) | 2017.12.09 |
|---|---|
| 3. Your First JavaFX Application with OpenCV (OpenCV를 사용한 첫 번째 JavaFX 응용 프로그램) (0) | 2017.12.09 |
| 1.Installing OpenCV for Java (java 용 OpenCV 설치) (0) | 2017.12.08 |
| JAVA 오토 타이핑 프로그렘 만들기 (11) | 2017.11.15 |
| 장진만쌤의 Sung Kim 교수님의 모두의 RL 수업을 보고 나서 따라 하기 (0) | 2017.10.16 |


