Your First JavaFX Application with OpenCV
Note
We assume that by now you have already read the previous tutorials. If not, please check previous tutorials at http://opencv-java-tutorials.readthedocs.org/en/latest/index.html. You can also find the source code and resources at https://github.com/opencv-java/
우리는 지금까지 이미 이전 튜토리얼을 읽었다 고 가정합니다. 그렇지 않은 경우 http://opencv-java-tutorials.readthedocs.org/en/latest/index.html에서 이전 자습서를 확인하십시오. https://github.com/opencv-java/에서 소스 코드와 리소스를 찾을 수도 있습니다.
Note
We assume that by now you have already read the previous tutorials. If not, please check previous tutorials at http://opencv-java-tutorials.readthedocs.org/en/latest/index.html. You can also find the source code and resources at https://github.com/opencv-java/
A JavaFX application with OpenCV
This tutorial will guide you through the creation of a simple JavaFX GUI application using the OpenCV library in Eclipse.
이 튜토리얼은 Eclipse에서 OpenCV 라이브러리를 사용하여 간단한 JavaFX GUI 애플리케이션을 작성하는 방법을 안내합니다.
This tutorial will guide you through the creation of a simple JavaFX GUI application using the OpenCV library in Eclipse.
What we will do in this tutorial
- In this guide, we will:
- Install the
e(fx)clipse plugin and (optionally) Scene Builder. - Work with Scene Builder.
- Write and Run our application.
- In this guide, we will:
- Install the
e(fx)clipseplugin and (optionally) Scene Builder. - Work with Scene Builder.
- Write and Run our application.
- Install the
- e (fx) clipse 플러그인과 (선택적으로) Scene Builder를 설치하십시오.
- Scene Builder로 작업하십시오.
- 우리의 응용 프로그램을 작성하고 실행하십시오.
Your First Application in JavaFX
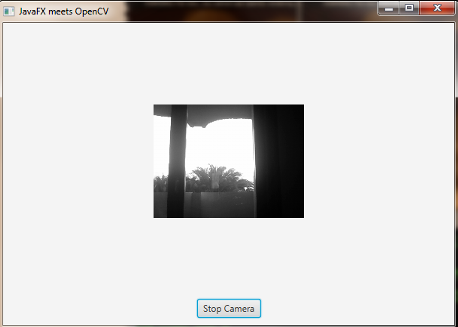
The application you will write by following this tutorial is going to capture a video stream from a webcam and, then, it will display it on the user interface (GUI). We will create the GUI with Scene Builder: it is will have a button, which will allow us to start and stop the stream, and a simple image view container where we will put each stream frame.
이 자습서를 따라 작성하는 응용 프로그램은 웹캠에서 비디오 스트림을 캡처 한 다음 사용자 인터페이스 (GUI)에 표시합니다. 우리는 Scene Builder로 GUI를 만들 것입니다 : 그것은 우리가 스트림을 시작하고 멈출 수있는 버튼과 우리가 각 스트림 프레임을 넣을 간단한 이미지 뷰 컨테이너를 가질 것입니다.
The application you will write by following this tutorial is going to capture a video stream from a webcam and, then, it will display it on the user interface (GUI). We will create the GUI with Scene Builder: it is will have a button, which will allow us to start and stop the stream, and a simple image view container where we will put each stream frame.
Installing e(fx)clipse plugin and Scene Builder
In Eclipse, install the e(fx)clipse plugin, by following the guide at http://www.eclipse.org/efxclipse/install.html#fortheambitious. If you choose not to install such a plugin, you have to create a traditional Java project, only. Download and install JavaFX Scene Builder 2.0 from http://www.oracle.com/technetwork/java/javafxscenebuilder-1x-archive-2199384.html.
Eclipse에서 http://www.eclipse.org/efxclipse/install.html#fortheambitious의 가이드에 따라 e (fx) 클립se 플러그인을 설치하십시오. 그러한 플러그인을 설치하지 않기로 결정했다면, 전통적인 Java 프로젝트 만 생성해야합니다.
직접 실행해보면 찍은 스크린샷을 참고하시라고 첨부합니다.
http://www.oracle.com/technetwork/java/javafxscenebuilder-1x-archive-2199384.html에서 JavaFX Scene Builder 2.0을 다운로드하여 설치하십시오.
fx 설치 시참고할 만한 사이트를 링크합니다.http://code.makery.ch/library/javafx-8-tutorial/kr/part1/
Now you can create a new JavaFX project. Go to File > New > Project... and select JavaFX project....
이제 새로운 JavaFX 프로젝트를 만들 수 있습니다. 파일> 새로 만들기> 프로젝트 ...로 이동하여 JavaFX 프로젝트 ...를 선택합니다.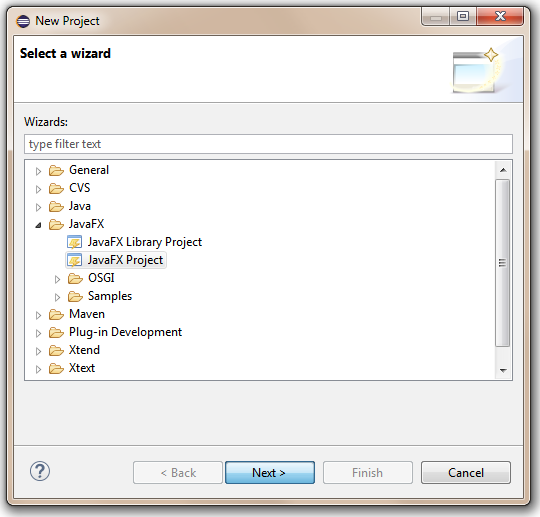 주의 !! : 일반 java project 가 아닌 JavaFX project 입니다.
Choose a name for your project and click Next.
프로젝트의 이름을 선택하고 다음을 클릭하십시오.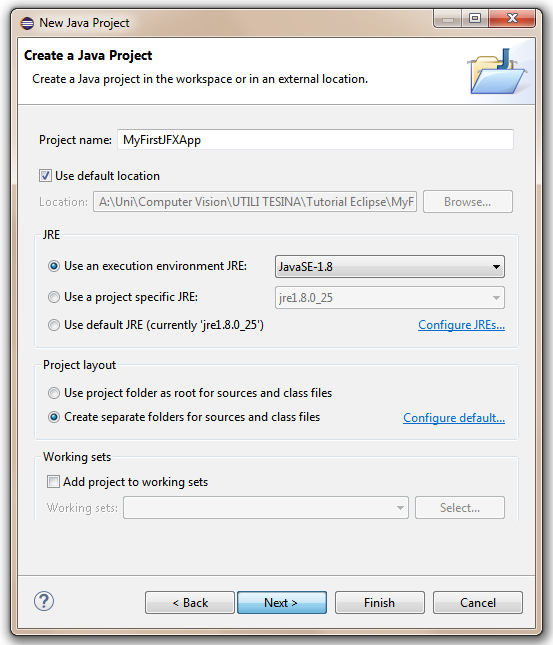
Now add your OpenCV user library to your project and click Next.
이제 OpenCV 사용자 라이브러리를 프로젝트에 추가하고 다음을 클릭하십시오.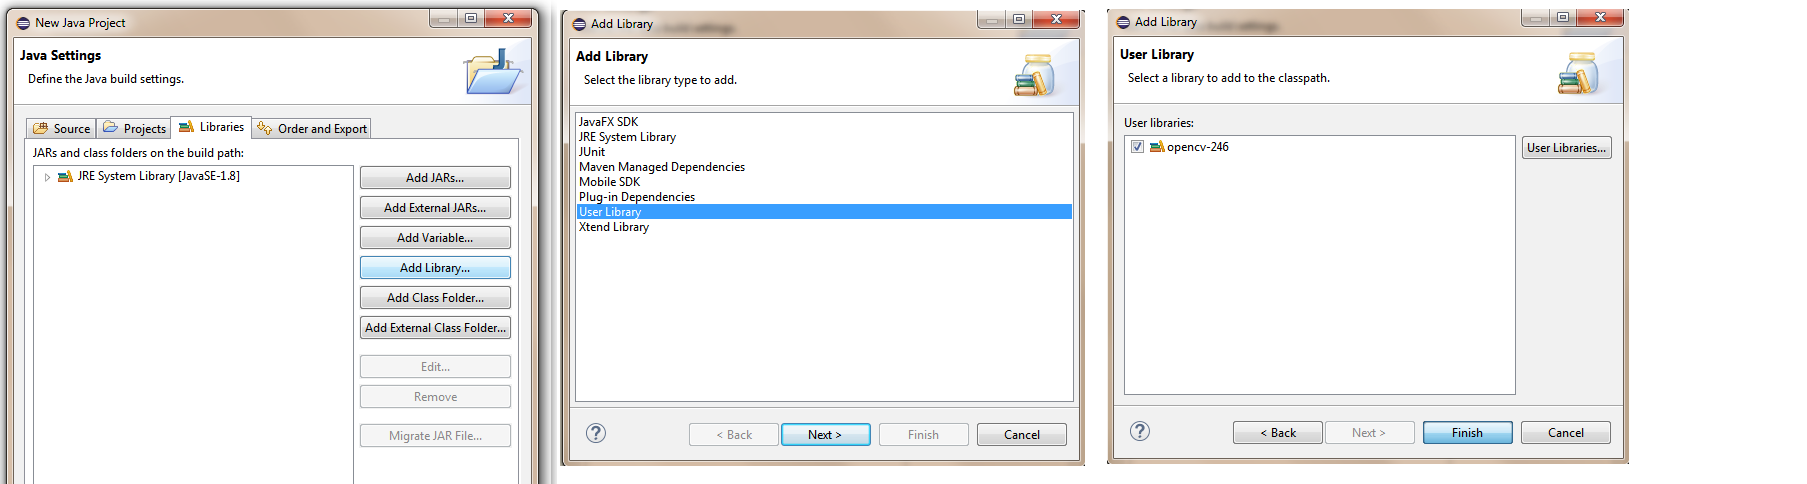
Choose a name for your package, for the FXML file and for the Controller Class. The FXML file will contain the description of your GUI in FXML language, while the Controller Class will handle all the method and event which have to be called and managed when the user interacts with the GUI’s components.
패키지 이름, FXML 파일 및 컨트롤러 클래스를 선택하십시오. FXML 파일에는 GUI에 대한 설명이 FXML 언어로 포함되며 Controller 클래스는 사용자가 GUI 구성 요소와 상호 작용할 때 호출 및 관리해야하는 모든 메서드와 이벤트를 처리합니다.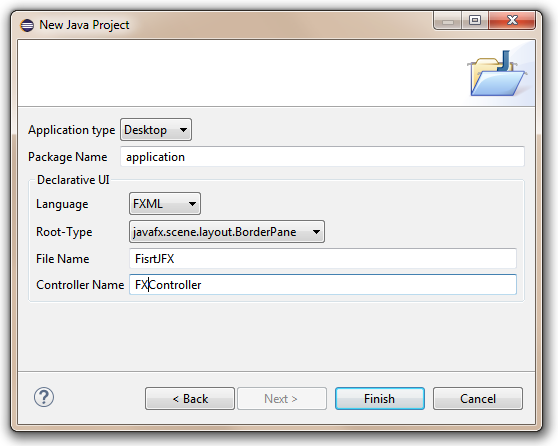
In Eclipse, install the e(fx)clipse plugin, by following the guide at http://www.eclipse.org/efxclipse/install.html#fortheambitious. If you choose not to install such a plugin, you have to create a traditional Java project, only. Download and install JavaFX Scene Builder 2.0 from http://www.oracle.com/technetwork/java/javafxscenebuilder-1x-archive-2199384.html.


Now you can create a new JavaFX project. Go to File > New > Project... and select JavaFX project....
Choose a name for your project and click Next.
Now add your OpenCV user library to your project and click Next.
Choose a name for your package, for the FXML file and for the Controller Class. The FXML file will contain the description of your GUI in FXML language, while the Controller Class will handle all the method and event which have to be called and managed when the user interacts with the GUI’s components.
Working with Scene Builder
If you have installed Scene Builder you can now right click on your FXML file in Eclipse and select Open with SceneBuilder. Scene Builder can help construct you gui by interacting with a graphic interface; this allows you to see a real time preview of your window and modify your components and their position just by editing the graphic preview. Let’s take a look at what I’m talking about. At fist the FXML file will have just an AnchorPane. An AnchorPane allows the edges of child nodes to be anchored to an offset from the anchorpane’s edges. If the anchorpane has a border and/or padding set, the offsets will be measured from the inside edge of those insets. The anchorpane lays out each managed child regardless of the child’s visible property value; unmanaged children are ignored for all layout calculations. You can go ahead and delete the anchorpane and add a BorderPane instead. A BorderPane lays out children in top, left, right, bottom, and center positions.
Scene Builder를 설치했다면 Eclipse에서 FXML 파일을 마우스 오른쪽 버튼으로 클릭하고 SceneBuilder로 열기를 선택할 수 있습니다. Scene Builder는 그래픽 인터페이스와 상호 작용하여 GUI를 구성 할 수 있습니다. 이렇게하면 그래픽 미리보기를 편집하여 윈도우의 실시간 미리보기를보고 구성 요소와 위치를 수정할 수 있습니다. 제가 무슨 말을하는지 봅시다. fist에서 FXML 파일은 AnchorPane 만 가질 것입니다. AnchorPane는, 아이 노드의 엣지를 엥커 팬의 엣지로부터의 오프셋 (offset)에 엥커하는 것을 가능하게합니다. 앵커 판에 보더 및 / 또는 패딩 세트가있는 경우, 그 인 세트의 안쪽 가장자리로부터의 오프셋이 측정됩니다. 앵커 팬은 자식의 표시 속성 값에 관계없이 관리되는 각 자식을 배치합니다. 관리되지 않는 자식은 모든 레이아웃 계산에서 무시됩니다. 앵커 패널을 삭제하고 대신 BorderPane을 추가 할 수 있습니다. BorderPane는 상하 좌우의 아이를 레이아웃합니다.
Opening the file with SceneBuilder failed. Try setting the absolute path to scenebuilder in your the preferences
SceneBuilder로 파일을 열지 못했습니다. 환경 설정에서 씬 빌더의 절대 경로를 설정해보십시오.
만약 위와같은 메시지가 나온다면 .. 저의 경우 http://www.oracle.com/technetwork/java/javafxscenebuilder-1x-archive-2199384.html 사이트에서 JavaFX Scene Builder 2.0 을 다운 받지 않아서 였습니다.
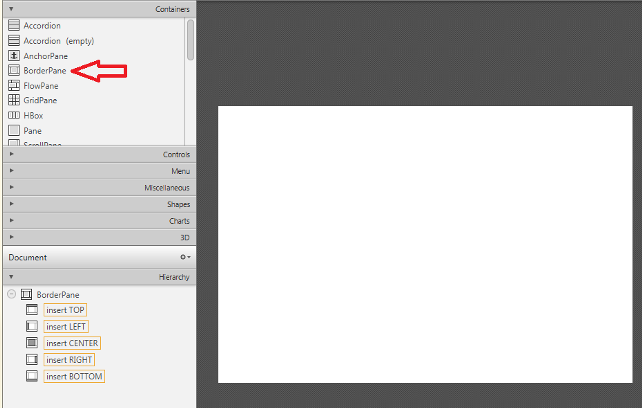
You can add a BorderPane by dragging from the Container menu a borderpane and then drop it in the Hierarchy menu. Now we can add the button that will allow us to start and stop the stream. Take a button component from the Controls menu and drop it on the BOTTOM field of our BP. As we can see, on the right we will get three menus (Properties, Layout, Code) which are used to customize our selected component. For example we can change text of our button in “Start Camera” in the Text field under the Properties menu and the id of the button (e.g. “start_btn”) in the fx:id field under the Code menu.
컨테이너 메뉴에서 테두리 패널을 드래그하여 계층 구조 메뉴에 놓아서 BorderPane을 추가 할 수 있습니다. 이제 스트림을 시작하고 중지 할 수있는 버튼을 추가 할 수 있습니다. Controls 메뉴에서 버튼 구성 요소를 가져와 BP의 BOTTOM 필드에 놓으십시오. 보시다시피, 오른쪽에는 선택한 구성 요소를 사용자 정의하는 데 사용되는 세 가지 메뉴 (속성, 레이아웃, 코드)가 표시됩니다. 예를 들어 코드 메뉴의 fx : id 필드에서 속성 메뉴의 텍스트 필드에있는 "카메라 시작"과 버튼의 ID (예 : "start_btn")에서 버튼의 텍스트를 변경할 수 있습니다.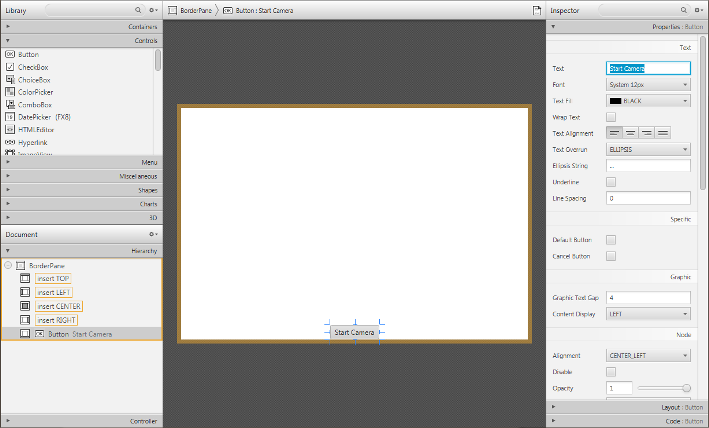
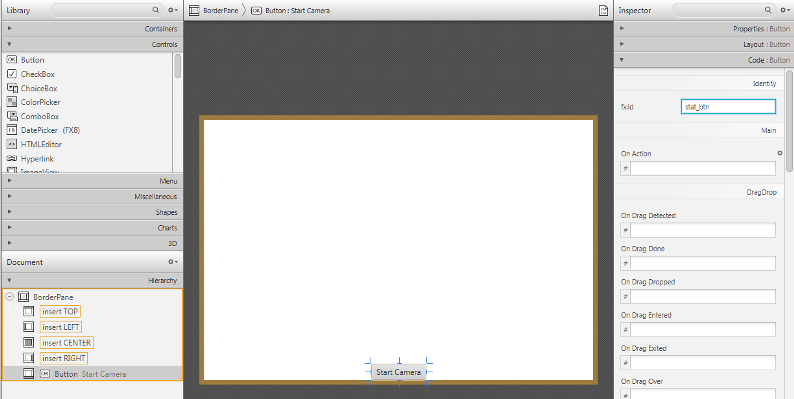
We are going to need the id of the button later, in order to edit the button properties from our Controller‘s methods. As you can see our button is too close to the edge of the windows, so we should add some bottom margin to it; to do so we can add this information in the Layout menu. In order to make the button work, we have to set the name of the method (e.g. “startCamera”) that will execute the action we want to preform in the field OnAction under the Code menu.
컨트롤러의 메소드에서 버튼 속성을 편집하려면 나중에 버튼의 ID가 필요합니다. 보시다시피 버튼이 창 가장자리에 너무 가깝기 때문에 아래쪽 여백을 추가해야합니다. 이렇게하려면 레이아웃 메뉴에서이 정보를 추가 할 수 있습니다. 버튼을 작동 시키려면 코드 메뉴의 OnAction 필드에서 수행 할 작업을 실행할 메서드 이름 (예 : "startCamera")을 설정해야합니다.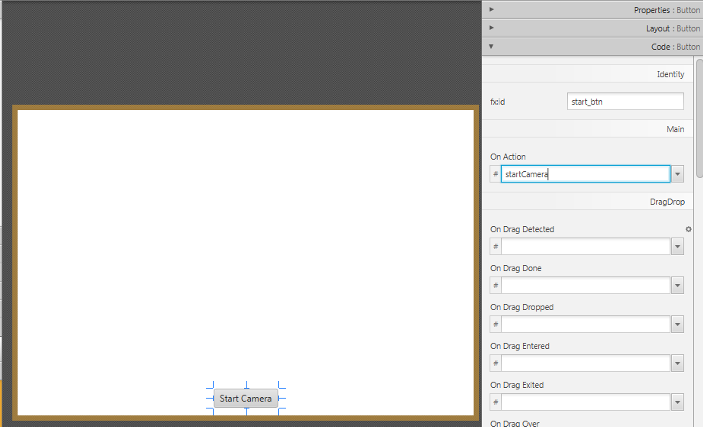
Now, we shall add an ImageView component from the Controls menu into the CENTER field of our BP. Let’s also edit the id of the image view (e.g. “currentFrame”), and add some margin to it.
이제 BP의 CENTER 필드에 Controls 메뉴의 ImageView 컴포넌트를 추가합니다. 이미지보기의 ID (예 : 'currentFrame')를 수정하고 여백을 추가해 보겠습니다.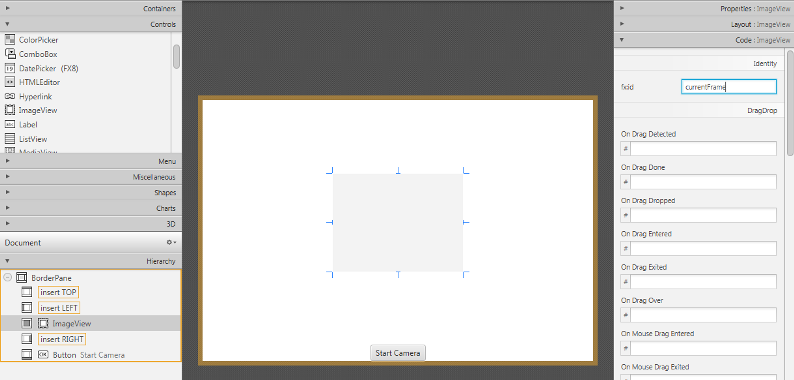
Finally we have to tell which Controller class will mange the GUI, we can do so by adding our controller class name in the Controller class field under the Controller menu located in the bottom left corner of the window.
마지막으로 우리는 어떤 Controller 클래스가 GUI를 관리 할 것인지를 말해야합니다. 우리는 컨트롤러 클래스 필드에 컨트롤러 클래스 필드를 추가합니다. 컨트롤러 클래스 필드는 윈도우의 왼쪽 하단 모서리에 있습니다.We just created our first GUI by using Scene Builder, if you save the file and return to Eclipse you will notice that some FXML code has been generated automatically.
Scene Builder를 사용하여 첫 번째 GUI를 만들었습니다. 파일을 저장하고 Eclipse로 돌아 가면 FXML 코드가 자동 생성됩니다.
If you have installed Scene Builder you can now right click on your FXML file in Eclipse and select Open with SceneBuilder. Scene Builder can help construct you gui by interacting with a graphic interface; this allows you to see a real time preview of your window and modify your components and their position just by editing the graphic preview. Let’s take a look at what I’m talking about. At fist the FXML file will have just an AnchorPane. An AnchorPane allows the edges of child nodes to be anchored to an offset from the anchorpane’s edges. If the anchorpane has a border and/or padding set, the offsets will be measured from the inside edge of those insets. The anchorpane lays out each managed child regardless of the child’s visible property value; unmanaged children are ignored for all layout calculations. You can go ahead and delete the anchorpane and add a BorderPane instead. A BorderPane lays out children in top, left, right, bottom, and center positions.
Opening the file with SceneBuilder failed. Try setting the absolute path to scenebuilder in your the preferences
You can add a BorderPane by dragging from the Container menu a borderpane and then drop it in the Hierarchy menu. Now we can add the button that will allow us to start and stop the stream. Take a button component from the Controls menu and drop it on the BOTTOM field of our BP. As we can see, on the right we will get three menus (Properties, Layout, Code) which are used to customize our selected component. For example we can change text of our button in “Start Camera” in the Text field under the Properties menu and the id of the button (e.g. “start_btn”) in the fx:id field under the Code menu.
We are going to need the id of the button later, in order to edit the button properties from our Controller‘s methods. As you can see our button is too close to the edge of the windows, so we should add some bottom margin to it; to do so we can add this information in the Layout menu. In order to make the button work, we have to set the name of the method (e.g. “startCamera”) that will execute the action we want to preform in the field OnAction under the Code menu.
Now, we shall add an ImageView component from the Controls menu into the CENTER field of our BP. Let’s also edit the id of the image view (e.g. “currentFrame”), and add some margin to it.
Finally we have to tell which Controller class will mange the GUI, we can do so by adding our controller class name in the Controller class field under the Controller menu located in the bottom left corner of the window.
We just created our first GUI by using Scene Builder, if you save the file and return to Eclipse you will notice that some FXML code has been generated automatically.
Key Concepts in JavaFX
The Stage is where the application will be displayed (e.g., a Windows’ window). A Scene is one container of Nodes that compose one “page” of your application. A Node is an element in the Scene, with a visual appearance and an interactive behavior. Nodes may be hierarchically nested . In the Main class we have to pass to the start function our primary stage:
스테이지는 애플리케이션이 표시되는 곳입니다 (예 : Windows의 창). Scene은 응용 프로그램의 "페이지"를 구성하는 노드 컨테이너입니다. 노드는 시각적 인 모양과 대화식 동작을 사용하여 장면의 요소입니다. 노드는 계층 적으로 중첩 될 수 있습니다. Main 클래스에서 start 함수에 전달해야하는 첫 번째 단계는 다음과 같습니다.public void start(Stage primaryStage)
and load the fxml file that will populate our stage, the root element of the scene and the controller class:
무대, 장면의 루트 요소 및 컨트롤러 클래스를 채울 fxml 파일을로드하십시오.FXMLLoader loader = new FXMLLoader(getClass().getResource("FXHelloCV.fxml"));
BorderPane root = (BorderPane) loader.load();
FXController controller = loader.getController();
The Stage is where the application will be displayed (e.g., a Windows’ window). A Scene is one container of Nodes that compose one “page” of your application. A Node is an element in the Scene, with a visual appearance and an interactive behavior. Nodes may be hierarchically nested . In the Main class we have to pass to the start function our primary stage:
public void start(Stage primaryStage)
and load the fxml file that will populate our stage, the root element of the scene and the controller class:
FXMLLoader loader = new FXMLLoader(getClass().getResource("FXHelloCV.fxml"));
BorderPane root = (BorderPane) loader.load();
FXController controller = loader.getController();
Managing GUI Interactions With the Controller Class
For our application we need to do basically two thing: control the button push and the refreshment of the image view. To do so we have to create a reference between the gui components and a variable used in our controller class:
우리는 기본적으로 버튼 푸시 제어와 이미지 뷰의 리프레시 두 가지 작업을 수행해야합니다. 그렇게하기 위해서 우리는 gui 컴포넌트와 컨트롤러 클래스에서 사용되는 변수 사이에 레퍼런스를 생성해야합니다 :@FXML
private Button button;
@FXML
private ImageView currentFrame;
The @FXML tag means that we are linking our variable to an element of the fxml file and the value used to declare the variable has to equal to the id set for that specific element.
@FXML 태그는 변수를 fxml 파일의 요소에 연결하고 변수를 선언하는 데 사용 된 값이 해당 특정 요소에 설정된 ID와 같아야 함을 의미합니다.The @FXML tag is used with the same meaning for the Actions set under the Code menu in a specific element.
@FXML 태그는 특정 요소의 코드 메뉴에있는 액션 집합과 동일한 의미로 사용됩니다.for:
<Button fx:id="button" mnemonicParsing="false" onAction="#startCamera" text="Start Camera" BorderPane.alignment="CENTER">
we set:
@FXML
protected void startCamera(ActionEvent event) { ...
For our application we need to do basically two thing: control the button push and the refreshment of the image view. To do so we have to create a reference between the gui components and a variable used in our controller class:
@FXML
private Button button;
@FXML
private ImageView currentFrame;
The @FXML tag means that we are linking our variable to an element of the fxml file and the value used to declare the variable has to equal to the id set for that specific element.
The @FXML tag is used with the same meaning for the Actions set under the Code menu in a specific element.
for:
<Button fx:id="button" mnemonicParsing="false" onAction="#startCamera" text="Start Camera" BorderPane.alignment="CENTER">
we set:
@FXML
protected void startCamera(ActionEvent event) { ...
Video Capturing
Essentially, all the functionalities required for video manipulation is integrated in the VideoCapture class.
기본적으로 비디오 조작에 필요한 모든 기능은 VideoCapture 클래스에 통합되어 있습니다.private VideoCapture capture = new VideoCapture();
This on itself builds on the FFmpeg open source library. A video is composed of a succession of images, we refer to these in the literature as frames. In case of a video file there is a frame rate specifying just how long is between two frames. While for the video cameras usually there is a limit of just how many frames they can digitalize per second. In our case we set as frame rate 30 frames per sec. To do so we initialize a timer (i.e., a `ScheduledExecutorService`) that will open a background task every 33 milliseconds.
이것 자체는 FFmpeg 오픈 소스 라이브러리를 기반으로합니다. 비디오는 일련의 이미지들로 구성되어 있으며, 우리는 이들을 문헌들에서 프레임들이라고 부릅니다. 비디오 파일의 경우 두 프레임 사이의 길이를 지정하는 프레임 속도가 있습니다. 비디오 카메라의 경우 일반적으로 초당 디지털화 할 수있는 프레임 수의 제한이 있습니다. 우리의 경우 우리는 프레임 속도를 초당 30 프레임으로 설정했습니다. 이를 위해 33 밀리 초마다 백그라운드 작업을 열리는 타이머 (즉, ScheduledExecutorService)를 초기화합니다.Runnable frameGrabber = new Runnable() { ... }
this.timer = Executors.newSingleThreadScheduledExecutor();
this.timer.scheduleAtFixedRate(frameGrabber, 0, 33, TimeUnit.MILLISECONDS);
To check if the binding of the class to a video source was successful or not use the isOpenedfunction:
비디오 소스에 클래스의 바인딩이 성공했는지 또는 isOpenedfunction을 사용하지 않았는지 확인하려면 :if (this.capture.isOpened()) { ... }
Closing the video is automatic when the objects destructor is called. However, if you want to close it before this you need to call its release function.
객체 소멸자가 호출되면 비디오를 닫습니다. 그러나 이전에 닫으려면 릴리스 함수를 호출해야합니다.this.capture.release();
The frames of the video are just simple images. Therefore, we just need to extract them from the VideoCapture object and put them inside a Mat one.
비디오의 프레임은 단순한 이미지입니다. 따라서 VideoCapture 객체에서 추출하여 Mat 내부에 배치하면됩니다.Mat frame = new Mat();
The video streams are sequential. You may get the frames one after another by the read or the overloaded >> operator.
비디오 스트림은 순차적입니다. >> 읽기 또는 오버로드 된 >> 연산자로 프레임을 차례로 가져올 수 있습니다.this.capture.read(frame);
Now we are going to convert our image from BGR to Grayscale format. OpenCV has a really nice function to do this kind of transformations:
이제 이미지를 BGR에서 Grayscale 형식으로 변환 할 것입니다. OpenCV는 이런 종류의 변형을 수행하는 정말 좋은 기능을 가지고 있습니다 :Imgproc.cvtColor(frame, frame, Imgproc.COLOR_BGR2GRAY);
- As you can see, cvtColor takes as arguments:
- a source image (frame)
- a destination image (frame), in which we will save the converted image.
- an additional parameter that indicates what kind of transformation will be performed. In this case we use
COLOR_BGR2GRAY (because of imread has BGR default channel order in case of color images).
보시다시피, cvtColor는 인수를 취합니다.
- 소스 이미지 (프레임)
- 변환 된 이미지를 저장하는 대상 이미지 (프레임).
- 수행 할 변형의 종류를 나타내는 추가 매개 변수입니다. 이 경우 우리는 COLOR_BGR2GRAY를 사용합니다 (왜냐하면 imread는 컬러 이미지의 경우 BGR 기본 채널 순서를 갖기 때문입니다).
Now in order to put the captured frame into the ImageView we need to convert the Mat in a Image. We first create a buffer to store the Mat.
이제 캡쳐 된 프레임을 ImageView에 넣으려면 이미지의 매트를 변환해야합니다. 매트를 저장하기위한 버퍼를 먼저 생성합니다.MatOfByte buffer = new MatOfByte();
Then we can put the frame into the buffer by using the imencode function:
그런 다음 imencode 함수를 사용하여 프레임을 버퍼에 넣을 수 있습니다.Imgcodecs.imencode(".png", frame, buffer);
This encodes an image into a memory buffer. The function compresses the image and stores it in the memory buffer that is resized to fit the result.
이미지를 메모리 버퍼로 인코딩합니다. 이 함수는 이미지를 압축하여 결과에 맞게 크기가 조정 된 메모리 버퍼에 저장합니다.Note
imencode returns single-row matrix of type CV_8UC1 that contains encoded image as array of bytes.
imencode는 인코딩 된 이미지를 바이트 배열로 포함하는 CV_8UC1 유형의 단일 행렬을 반환합니다.- It takes three parameters:
- (”.png”) File extension that defines the output format.
- (frame) Image to be written.
- (buffer) Output buffer resized to fit the compressed image.
세 가지 매개 변수가 필요합니다. - ( ".png") 출력 형식을 정의하는 파일 확장명입니다. - (프레임) 쓸 이미지. - (버퍼) 압축 된 이미지에 맞게 출력 버퍼의 크기가 조정됩니다.Once we filled the buffer we have to stream it into an Image by using ByteArrayInputStream:
버퍼를 채우고 나면 ByteArrayInputStream을 사용하여 이미지로 스트리밍해야합니다.new Image(new ByteArrayInputStream(buffer.toArray()));
Now we can put the new image in the ImageView. With Java 1.8 we cannot perform an update of a GUI element in a thread that differs from the main thread; so we need to get the new frame in a second thread and refresh our ImageView in the main thread:
이제 ImageView에 새 이미지를 넣을 수 있습니다. Java 1.8에서는 주 스레드와 다른 스레드에서 GUI 요소를 업데이트 할 수 없습니다. 두 번째 스레드에서 새 프레임을 가져와 주 스레드에서 ImageView를 새로 고쳐야합니다.Image imageToShow = grabFrame();
Platform.runLater(new Runnable() {
@Override public void run() { currentFrame.setImage(imageToShow); }
});
The source code of the entire tutorial is available on GitHub.
전체 자습서의 소스 코드는 GitHub에서 사용할 수 있습니다.
Essentially, all the functionalities required for video manipulation is integrated in the VideoCapture class.
private VideoCapture capture = new VideoCapture();
This on itself builds on the FFmpeg open source library. A video is composed of a succession of images, we refer to these in the literature as frames. In case of a video file there is a frame rate specifying just how long is between two frames. While for the video cameras usually there is a limit of just how many frames they can digitalize per second. In our case we set as frame rate 30 frames per sec. To do so we initialize a timer (i.e., a `ScheduledExecutorService`) that will open a background task every 33 milliseconds.
Runnable frameGrabber = new Runnable() { ... }
this.timer = Executors.newSingleThreadScheduledExecutor();
            this.timer.scheduleAtFixedRate(frameGrabber, 0, 33, TimeUnit.MILLISECONDS);
To check if the binding of the class to a video source was successful or not use the isOpenedfunction:
if (this.capture.isOpened()) { ... }
Closing the video is automatic when the objects destructor is called. However, if you want to close it before this you need to call its release function.
this.capture.release();
The frames of the video are just simple images. Therefore, we just need to extract them from the VideoCapture object and put them inside a Mat one.
Mat frame = new Mat();
The video streams are sequential. You may get the frames one after another by the read or the overloaded >> operator.
this.capture.read(frame);
Now we are going to convert our image from BGR to Grayscale format. OpenCV has a really nice function to do this kind of transformations:
Imgproc.cvtColor(frame, frame, Imgproc.COLOR_BGR2GRAY);
- As you can see, cvtColor takes as arguments:
- a source image (frame)
- a destination image (frame), in which we will save the converted image.
- an additional parameter that indicates what kind of transformation will be performed. In this case we use
COLOR_BGR2GRAY(because ofimreadhas BGR default channel order in case of color images).
Now in order to put the captured frame into the ImageView we need to convert the Mat in a Image. We first create a buffer to store the Mat.
MatOfByte buffer = new MatOfByte();
Then we can put the frame into the buffer by using the imencode function:
Imgcodecs.imencode(".png", frame, buffer);
This encodes an image into a memory buffer. The function compresses the image and stores it in the memory buffer that is resized to fit the result.
Note
imencode returns single-row matrix of type CV_8UC1 that contains encoded image as array of bytes.
- It takes three parameters:
- (”.png”) File extension that defines the output format.
- (frame) Image to be written.
- (buffer) Output buffer resized to fit the compressed image.
Once we filled the buffer we have to stream it into an Image by using ByteArrayInputStream:
new Image(new ByteArrayInputStream(buffer.toArray()));
Now we can put the new image in the ImageView. With Java 1.8 we cannot perform an update of a GUI element in a thread that differs from the main thread; so we need to get the new frame in a second thread and refresh our ImageView in the main thread:
Image imageToShow = grabFrame();
Platform.runLater(new Runnable() {
        @Override public void run() { currentFrame.setImage(imageToShow); }
});
The source code of the entire tutorial is available on GitHub.
하 하 하
필자도 노트북을 사용하지만 노트북에 캠드라이버를 설치한 경험이 없다. 결국 소스는 구동되지만 카메라를 찾을 수 없어 Image 부분에 아무것도 출력되지 않는다.
이미지를 불러올 수는 없을까 찾아보니 괜찮은 블러그가 있어 링크 한다.
http://blog.daum.net/kurtjim/13688747
1 2 3 4 5 6 7 8 9 10 11 12 13 14 15 16 17 18 19 20 21 22 23 24 25 26 27 28 29 30 31 32 33 34 35 36 37 38 39 40 41 42 43 44 45 46 47 48 49 50 51 52 53 54 55 56 57 58 59 60 61 62 63 64 65 66 67 68 69 70 71 72 73 74 75 76 77 78 79 80 81 82 83 84 85 86 87 88 89 90 91 92 93 94 95 | package application; import java.io.ByteArrayInputStream; import org.opencv.core.Core; import org.opencv.core.Mat; import org.opencv.core.MatOfByte; import org.opencv.imgcodecs.Imgcodecs; // 자바 라이브러리 import javafx.application.Application; import javafx.geometry.Insets; import javafx.geometry.Pos; import javafx.scene.Group; import javafx.scene.Scene; import javafx.scene.control.Button; import javafx.scene.image.Image; import javafx.scene.image.ImageView; import javafx.scene.layout.VBox; import javafx.stage.Stage; public class Main extends Application { @Override public void start(Stage primaryStage) throws Exception { Stage stage = new Stage(); Group root = new Group(); System.loadLibrary(Core.NATIVE_LIBRARY_NAME); Mat in_image = new Mat(); // 이미지 불로오는 부분 // in_image = Imgcodecs.imread("D:\\opencv_image_lib\\lena.png"); in_image = Imgcodecs.imread("D:\\OpenCv\\220px-Lenna.png"); // 문제는 바로 이 부분 Mat 으로 된 in_image의 경우 Javafx나 swt 등에서 바로 ImageView를 할 수 없기에 // 다음과 같이 바꿔서 하시면 됩니다. 아래 2줄은 stackOverflow에서 참고하였음. MatOfByte byteMat = new MatOfByte(); Imgcodecs.imencode(".png", in_image, byteMat); Image img = new Image(new ByteArrayInputStream(byteMat.toArray())); ImageView imageView = new ImageView(); imageView.setImage(img); // -_- 귀찮아서 VBox 하나 만들어 이미지 올렸음돠.. VBox vbox = new VBox(); vbox.setAlignment(Pos.CENTER); vbox.getChildren().add(imageView); // 그래도 GUI 인데 EXIT 버튼 하나 달아주는 센스. Button btnExit = new Button("Exit"); btnExit.setPrefHeight(30); btnExit.setMaxWidth(Double.MAX_VALUE); btnExit.setPadding(new Insets(10)); btnExit.setOnAction(e -> System.exit(0)); vbox.getChildren().add(btnExit); root.getChildren().add(vbox); Double width = img.getWidth(); Double height = img.getHeight() + btnExit.getPrefHeight() + 5; // width 하고 Height에 값이 잘들어 있나 할려고 넣었음 없어도 되는 부분. System.out.println(width + " : " + height); Scene scene = new Scene(root, width, height); stage.setScene(scene); stage.show(); } public static void main(String[] args) { launch(args); } } | cs |
주석을 보니 재미나신분 같다.
작성일자가 "쿠루쿠루족장 2015.07.02 17:49"
오늘은 2017-12-17 ... 2년전... 뒤쳐져있다는 생각이 든다 ...
노트북 카메라 없이는 더이상의 진행은 무리이다 싶어 찾아보았다.
http://sunstar2.tistory.com/1009
ManyCam 설치를 하고난 뒤 알게 되었다. 나의 노트묵 카메라는 멀정하다 ... 그렇다면 ... 앜!!! 뭔가 빼먹었다는것이다.
tutolial 의 소스와 github 의 소스가 달라서 연결에 문제가 있었다. 이런 ... 오류코드로 알려주지 않아서 소스는 정상인줄 알았다 ;;
소스를 첨부한다.
Main.java
1 2 3 4 5 6 7 8 9 10 11 12 13 14 15 16 17 18 19 20 21 22 23 24 25 26 27 28 29 30 31 32 33 34 35 36 37 38 39 40 41 42 43 44 45 46 47 48 49 50 51 52 | package application; import org.opencv.core.Core; import javafx.application.Application; import javafx.event.EventHandler; import javafx.stage.Stage; import javafx.stage.WindowEvent; import javafx.scene.Scene; import javafx.scene.layout.BorderPane; import javafx.fxml.FXMLLoader; public class Main extends Application { @Override public void start(Stage primaryStage) { try { // load the FXML resource FXMLLoader loader = new FXMLLoader(getClass().getResource("FisrtJFX.fxml")); // store the root element so that the controllers can use it BorderPane rootElement = (BorderPane) loader.load(); // create and style a scene Scene scene = new Scene(rootElement, 800, 600); scene.getStylesheets().add(getClass().getResource("application.css").toExternalForm()); // create the stage with the given title and the previously created // scene primaryStage.setTitle("JavaFX meets OpenCV"); primaryStage.setScene(scene); // show the GUI primaryStage.show(); // set the proper behavior on closing the application FXController controller = loader.getController(); primaryStage.setOnCloseRequest((new EventHandler<WindowEvent>() { public void handle(WindowEvent we) { controller.setClosed(); } })); } catch(Exception e) { e.printStackTrace(); } } public static void main(String[] args) { // load the native OpenCV library System.loadLibrary(Core.NATIVE_LIBRARY_NAME); launch(args); } } | cs |
FXController.java
1 2 3 4 5 6 7 8 9 10 11 12 13 14 15 16 17 18 19 20 21 22 23 24 25 26 27 28 29 30 31 32 33 34 35 36 37 38 39 40 41 42 43 44 45 46 47 48 49 50 51 52 53 54 55 56 57 58 59 60 61 62 63 64 65 66 67 68 69 70 71 72 73 74 75 76 77 78 79 80 81 82 83 84 85 86 87 88 89 90 91 92 93 94 95 96 97 98 99 100 101 102 103 104 105 106 107 108 109 110 111 112 113 114 115 116 117 118 119 120 121 122 123 124 125 126 127 128 129 130 131 132 133 134 135 136 137 138 139 140 141 142 143 144 145 146 147 148 149 150 151 152 153 154 155 156 157 158 159 160 161 162 163 164 165 166 167 168 169 170 171 172 173 174 175 176 177 | package application; import java.util.concurrent.Executors; import java.util.concurrent.ScheduledExecutorService; import java.util.concurrent.TimeUnit; import org.opencv.core.Mat; import org.opencv.imgproc.Imgproc; import org.opencv.videoio.VideoCapture; import application.utils.Utils; //import it.polito.elite.teaching.cv.utils.Utils; import javafx.event.ActionEvent; import javafx.fxml.FXML; import javafx.scene.control.Button; import javafx.scene.image.Image; import javafx.scene.image.ImageView; public class FXController { // the FXML button @FXML private Button button; // the FXML image view @FXML private ImageView currentFrame; // a timer for acquiring the video stream private ScheduledExecutorService timer; // the OpenCV object that realizes the video capture private VideoCapture capture = new VideoCapture(); // a flag to change the button behavior private boolean cameraActive = false; // the id of the camera to be used private static int cameraId = 0; /** * The action triggered by pushing the button on the GUI * * @param event * the push button event */ @FXML protected void startCamera(ActionEvent event) { if (!this.cameraActive) { // start the video capture this.capture.open(cameraId); // is the video stream available? if (this.capture.isOpened()) { this.cameraActive = true; // grab a frame every 33 ms (30 frames/sec) Runnable frameGrabber = new Runnable() { @Override public void run() { // effectively grab and process a single frame Mat frame = grabFrame(); // convert and show the frame Image imageToShow = Utils.mat2Image(frame); updateImageView(currentFrame, imageToShow); } }; this.timer = Executors.newSingleThreadScheduledExecutor(); this.timer.scheduleAtFixedRate(frameGrabber, 0, 33, TimeUnit.MILLISECONDS); // update the button content this.button.setText("Stop Camera"); } else { // log the error System.err.println("Impossible to open the camera connection..."); } } else { // the camera is not active at this point this.cameraActive = false; // update again the button content this.button.setText("Start Camera"); // stop the timer this.stopAcquisition(); } } /** * Get a frame from the opened video stream (if any) * * @return the {@link Mat} to show */ private Mat grabFrame() { // init everything Mat frame = new Mat(); // check if the capture is open if (this.capture.isOpened()) { try { // read the current frame this.capture.read(frame); // if the frame is not empty, process it if (!frame.empty()) { Imgproc.cvtColor(frame, frame, Imgproc.COLOR_BGR2GRAY); } } catch (Exception e) { // log the error System.err.println("Exception during the image elaboration: " + e); } } return frame; } /** * Stop the acquisition from the camera and release all the resources */ private void stopAcquisition() { if (this.timer!=null && !this.timer.isShutdown()) { try { // stop the timer this.timer.shutdown(); this.timer.awaitTermination(33, TimeUnit.MILLISECONDS); } catch (InterruptedException e) { // log any exception System.err.println("Exception in stopping the frame capture, trying to release the camera now... " + e); } } if (this.capture.isOpened()) { // release the camera this.capture.release(); } } /** * Update the {@link ImageView} in the JavaFX main thread * * @param view * the {@link ImageView} to update * @param image * the {@link Image} to show */ private void updateImageView(ImageView view, Image image) { Utils.onFXThread(view.imageProperty(), image); } /** * On application close, stop the acquisition from the camera */ protected void setClosed() { this.stopAcquisition(); } } | cs |
FisrtJFX.fxml
1 2 3 4 5 6 7 8 9 10 11 12 13 14 15 16 17 18 19 20 21 22 23 24 25 26 27 28 29 | <?xml version="1.0" encoding="UTF-8"?> <?import javafx.scene.image.*?> <?import javafx.geometry.*?> <?import java.lang.*?> <?import javafx.scene.control.*?> <?import javafx.scene.layout.*?> <?import javafx.scene.layout.BorderPane?> <BorderPane xmlns="http://javafx.com/javafx/8" xmlns:fx="http://javafx.com/fxml/1" fx:controller="application.FXController"> <bottom> <Button fx:id="button" mnemonicParsing="false" onAction="#startCamera" text="Start Camera" BorderPane.alignment="CENTER"> <BorderPane.margin> <Insets bottom="10.0" left="10.0" right="10.0" top="10.0" /> </BorderPane.margin> </Button> </bottom> <padding> <Insets bottom="10.0" left="10.0" right="10.0" top="10.0" /> </padding> <center> <ImageView fx:id="currentFrame" fitHeight="500.0" fitWidth="500.0" pickOnBounds="true" preserveRatio="true" BorderPane.alignment="CENTER"> <BorderPane.margin> <Insets /> </BorderPane.margin> </ImageView> </center> </BorderPane> | cs |
'DEV' 카테고리의 다른 글
| 5. Fourier Transform (푸리에 변환) (1) | 2017.12.09 |
|---|---|
| 4. OpenCV Basics (OpenCV 기초) (0) | 2017.12.09 |
| 2. Your First Java Application with OpenCV (OpenCV를 사용한 첫 번째 Java 응용 프로그램) (0) | 2017.12.09 |
| 1.Installing OpenCV for Java (java 용 OpenCV 설치) (0) | 2017.12.08 |
| JAVA 오토 타이핑 프로그렘 만들기 (12) | 2017.11.15 |

